DS8000模拟器安装手册
DS8000模拟器安装手册
1.安装要求
DS8000 存储管理模拟器可以在 Windows 和 Linux 平台上通过图形界面或静默方式安装。
服务器最小配置要求:
CPU : Pentium 4 processor 1.4GHz
内存: 1024MB
硬盘: 10G
浏览器版本要求:
Internet Explorer
6.X 或 7.X
Mozilla Firefox 1.5 and 2.0
注:浏览器的动画模式必须开启,火狐是默认开启的, IE 需要按以下步骤开启:工具 -->Internet 选项 ---> 高级 ---> 多媒体 ----> 在网页中播放动画 勾选
支持的操作系统:
Windows2000 Professional,Server,Advanced Server
Windows 2003 Server,Advanced Server
Windows XP professional
Redhat AS3.0 and 4.0
注:以上操作系统均为 32-bit, 64-bit统统不支持!!
2.下载安装介质
有Linux和Windows平台两种平台介质,找到你要安装的ISO文件下载,下文是安装DS8000StorageManager_WIN_5.4.36.1109.iso的简单过程。
3.开始安装
**(1)将介质映射到光驱,双击出现模拟器简介,如下图:**

( 2)打开 ISO文件找到 setup.exe
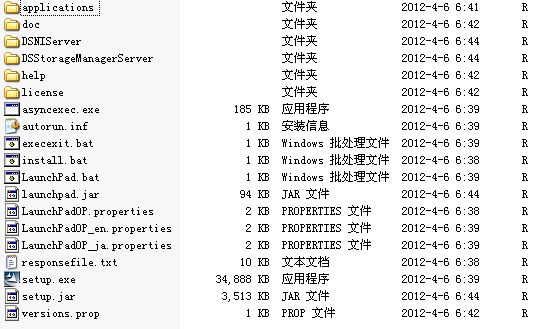
( 3)双击安装

( 4) Webcome界面

( 5)接受 license

(6)设置安装路径

( 7)检查空间

( 8)参数设定,如果只是学习默认即可;想深入可以修改,具体参数介绍:
· Host Name — The host name of the physical machine where the DS Storage Manager Server is installed. The host name must resolve to a physical network node on the server. When multiple network cards exist in the server, the host name or IP address must resolve to one of the network cards. The value that you specify for the host name is used as the value of the hostName property in WebSphere Application Server configuration files. Specify the host name value in one of the following formats:
o The fully qualified domain name servers (DNS) host name string; for example, _xmachine.manhattan.ibm.com_.
o The default short DNS host name string; for example, _xmachine_.
o The numeric IP address; for example, _9.127.255.3_.
o The generic name localhost or its equivalent IP address; for example, _127.0.0.1_.
Note: The specified value for the host name is stored by the WebSphere Application Server into its internal configuration files. If you specified the host name in the fully qualified form or the short host name string, do not change the host name after the DS Storage Manager Server installation. If you do, the host name and the name that you specified for the configuration file no longer match. If you do change the host name, you must manually edit all the WebSphere Application Server configuration files that contain references to the old name to reflect the new name. If you specified the host name in the form of the numeric IP address, you must use a fixed IP address for the computer (you cannot use DHCP to obtain a dynamic IP address for it). The above restrictions do not exist if you specified the host name in the form as _localhost_.
· HTTP Port — The port number that the DS Storage Manager Server uses. It is recommend that the port numbers specified in this section not be changed from the defaults. Doing so, might compromise remote support. The port number must be a port that is not being used by another process on the system. After the DS Storage Manager Server is installed, you must include this port number in the URL to access the console. That URL is the protocol name, plus the fully qualified host name, plus the port, plus DS8000/Console; for example, http://myhost.com:8451/DS8000/Console.
· HTTPS Port — The port that the DS Storage Manager Server uses for secure HTTP transport (HTTPS).
· Bootstrap/RMI Port — The port that the DS Storage Manager Server uses for the bootstrap port.
· SOAP Port — The port that the DS Storage Manager Server uses for Simple Object Access Protocol (SOAP).
· Server help Port — The port for the Eclipse help Server. This port is the one that the help system (based on Eclipse technology) uses to receive requests for help files.
Note: The values that are used in the Server Parameters window fields must not conflict with existing port assignments that are already on the system or reserved for use by another application.

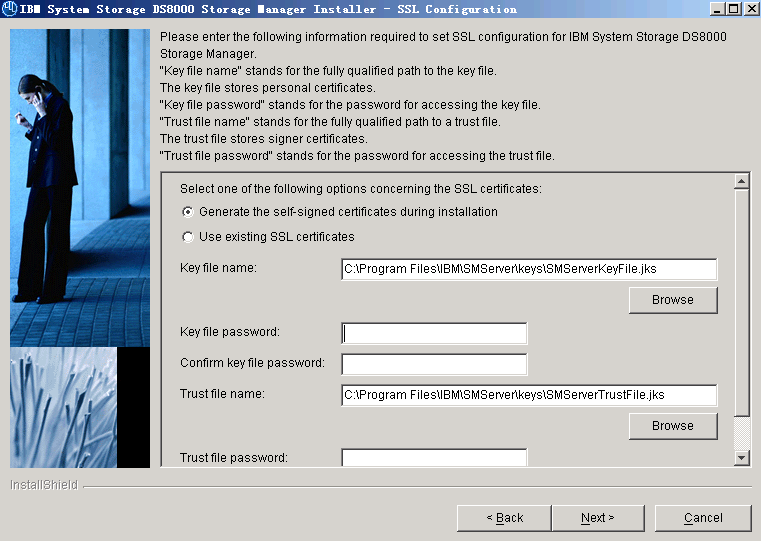
( 9) SSL配置,需要设定密码,至少 6位
- Designate whether you want to generate a new SSL certificate by selecting Generate the self-signed certificates during installation. This is the most likely selection when you are installing DS Storage Manager for the first time. You can also select Use existing SSL certificates. This choice is most likely made when the key files already exist and you do not want to generate new key files.
- Complete the rest of the fields on the window. Provide the fully qualified path to the key file and trust file by using the Browsebutton. The key file and trust file are identified by an extension of .jks.
- If you are creating new certificates, create a password for each file. The password must be a minimum of six characters and it cannot contain any blanks. Allowable characters are letters A - Z and a - z, digits 1 - 9, and special characters - and _ (hyphen and underscore). Supply the existing password if you are using an existing SSL certificate.
Record the location and passwords for the SSL certificates so that you can refer to them in the future if necessary.
(10)self-signed certificate信息,具体参数描述:
Keystore alias
This is the alias for the self-signed certificate. It uniquely identifies the certificate within the keystore file. It is a good practice to use a unique name related to the server name.
Key size
Two key sizes are available: 512 and 1024. 1024 is the default.
Common name
This name is the primary, universal identity for the certificate. If your system contains the secured WebSphere environment, this name must be valid in the configured user registry.
Organization name
The name of your company.
Organization unit (optional)
The name of a department or division within your company. Remember that you are building a profile for the certificate. As a security measure the more specific the information the more secure your system.
Locality (optional)
The city or location where your company resides.
State (optional)
The state or province where your company resides.
Country or region
The two-character designator that identifies the country where your company is located. Use the pull-down menu to make this selection.
Validity period (days)
Specifies the lifetime of the certificate in days.
 **
**
( 11**)开始安装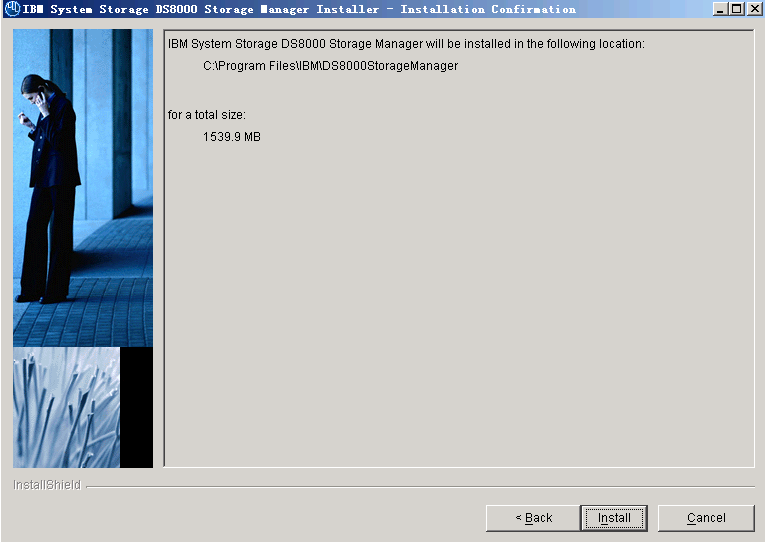
( 12)以下界面不需手工干预

( 13 ) go on
( 14 ) go on
( 15 ) go on
( 16 ) go on
( 17 ) go on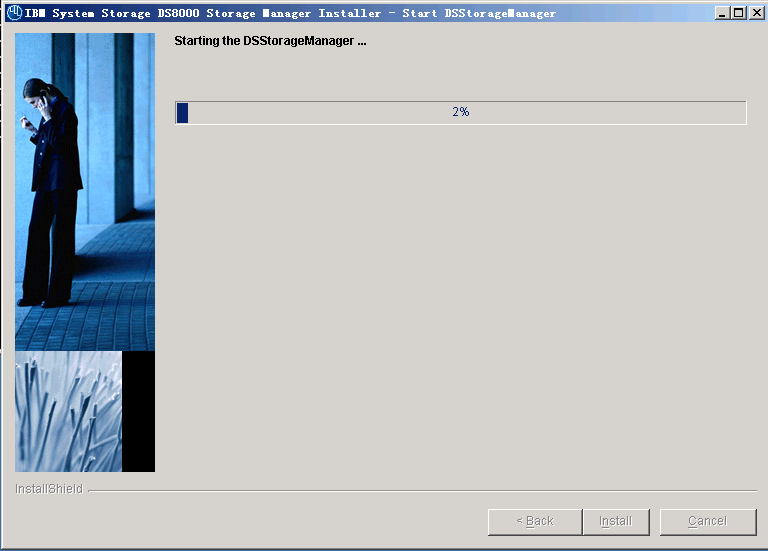
(18)安装完成

4.启动模拟器
( 1)开始 -à IBM system Storage DS8000 Storage Managerà Open DS Storage Manager

( 2)登录页面
用户名: admin
密码: admin

( 3)首次登录,需要修改密码,并且得符合复杂度!
Passwords must meet the following criteria:
- Be six to 16 characters long.
- Must contain five or more letters, and it must begin and end with a letter.
- Must contain one or more numbers.
- Cannot contain the user's user ID.
- Is case-sensitive.
- Four unique new passwords must be issued before an old password can be reused.

5. 开启你的 DS8000 学习
如果觉得我的文章对您有用,请点赞。您的支持将鼓励我继续创作!
赞3作者其他文章
评论 6 · 赞 9
评论 2 · 赞 4
评论 0 · 赞 4
评论 0 · 赞 2
评论 0 · 赞 4
添加新评论2 条评论
2023-06-27 09:45
2022-11-17 11:01