
MySQL for AIX 7.2
MySQL 官方现在不提供 Power/AIX平台新的MySQL 5.7, MySQL 8.0二进制安装包。
- 现在AIX平台的Linux Toolbox维护了MySQL 8.0的二进制程序包,可以直接从如下aixtoolbox链接中下载MySQL 8.0相关的rpm安装使用
https://ftp.software.ibm.com/aix/freeSoftware/aixtoolbox/ - 如果需要使用相对更老的版本的MySQL 5版本, AIX系统向下兼容性很好,MySQL官网上仍有比较老的MySQL for AIX的安装包仍可以继续在AIX 7下使用。
本文 分别阐述AIX 7.2环境下MySQL 8.0和 MySQL 5.1.66的安装和使用
准备AIX 7.2 环境
\# oslevel -s 这里假定安装好了AIX 7.2 TL5 SP2
7200-05-02-2114\--------------------------------------------------------------
\------------------------------- MySQL 8.0部分分割线 ---------
\--------------------------------------------------------------
首先简单说明如何AIX 7.2中安装、使用和验证 MySQL 8.0.20。- 下载安装yum包并配置yum源
https://ftp.software.ibm.com/aix/freeSoftware/aixtoolbox/ezinstall/ppc/yum_bundle_v6.tar
\# tar xf /home/yum/yum_bundle_v6.tar
\# rpm -Uvh \ \
ca-certificates-2016.10.7-2.aix6.1.ppc.rpm pysqlite-1.1.7-2.aix6.1.ppc.rpm python-urlgrabber-3.10.1-1.aix6.1.noarch.rpm \ \
curl-7.52.1-1.aix6.1.ppc.rpm python-2.7.10-1.aix6.1.ppc.rpm readline-6.1-2.aix6.1.ppc.rpm \\
db-4.8.24-3.aix6.1.ppc.rpm python-devel-2.7.10-1.aix6.1.ppc.rpm sqlite-3.15.2-1.aix6.1.ppc.rpm \ \
gdbm-1.8.3-5.aix5.2.ppc.rpm python-iniparse-0.4-1.aix6.1.noarch.rpm yum-3.4.3-8.aix6.1.noarch.rpm \ \
gettext-0.19.7-1.aix6.1.ppc.rpm python-pycurl-7.19.3-1.aix6.1.ppc.rpm yum-metadata-parser-1.1.4-2.aix6.1.ppc.rpm \ \
glib2-2.14.6-2.aix5.2.ppc.rpm python-tools-2.7.10-1.aix6.1.ppc.rpm
\# cat >/opt/freeware/etc/yum/yum.conf<<- EOF
[AIX_Toolbox]
name=Toolbox
baseurl=https://ftp.software.ibm.com/aix/freeSoftware/aixtoolbox/RPMS/ppc
enabled=1
gpgcheck=0
[AIX_Toolbox_noarch]
name=Toolbox_noarch
baseurl=https://ftp.software.ibm.com/aix/freeSoftware/aixtoolbox/RPMS/noarch
enabled=1
gpgcheck=0
[AIX_Toolbox_72]
name=Toolbox_72
baseurl=https://ftp.software.ibm.com/aix/freeSoftware/aixtoolbox/RPMS/ppc-7.2
enabled=1
gpgcheck=0
EOF
- 安装gcc,MySQL 8.0 for AIX依赖gcc运行时库
\# yum clean all; yum repolist
\ # yum install gcc gcc-g++
\ # export PATH=/opt/freeware/bin:$PATH
\ # type gcc
gcc is /opt/freeware/bin/gcc
\ # gcc --version
gcc (GCC) 8.3.0
- 安装MySQL 8.0 server, 准备my.cnf配置文件
\# yum install community-mysql-server
\# cat /etc/my.cnf
[mysqld]
basedir = /opt/freeware/
datadir = /data/mysql/
socket=/data/mysql/mysql.sock
tmpdir=/data/mysql/
log-error=/data/mysql/mysqld.log
pid-file=/data/mysql/mysqld.pid
default_authentication_plugin=mysql_native_password
lower_case_table_names=1
key_buffer_size = 2048M
join_buffer_size = 256K
sort_buffer_size = 256K
open_files_limit = 65535
table_open_cache = 10000
table_open_cache_instances=32
max_connections=1250
back_log=1250
default_storage_engine=InnoDB
default_tmp_storage_engine=InnoDB
innodb_log_file_size=1024M
innodb_log_files_in_group = 9
innodb_open_files=8000
innodb_file_per_table = true
innodb_data_file_path = ibdata1:1000M:autoextend
innodb_buffer_pool_size = 132G
innodb_buffer_pool_instances = 32
innodb_log_buffer_size=2048M
server-id=1
long_query_time=0.10
slow_query_log=on
slow_query_log_file=/data/mysql/slow-query.log
performance_schema=OFF
[client]
socket=/data/mysql/mysql.sock
[mysql]
socket=/data/mysql/mysql.sock
- 初始化MySQL 8.0, 验证 可用性
\# export PATH=/opt/freeware/bin:$PATH
初始化
\# mysqld --defaults-file=/etc/my.cnf --initialize --user=mysql
查看MySQL数据库初始密码
\# cat /data/mysql/mysqld.log
root@localhost: DhuQ:wCAJ2>,
启动MySQL
\# mysqld --defaults-file=/etc/my.cnf --user=mysql &
MySQL 初始化 安全设置
\# mysql_secure_installation -S /data/mysql/mysql.sock
Securing the MySQL server deployment.
Enter password for user root:
The existing password for the user account root has expired. Please set a new password.
New password:
Re-enter new password:
VALIDATE PASSWORD COMPONENT can be used to test passwords
and improve security. It checks the strength of password
and allows the users to set only those passwords which are
secure enough. Would you like to setup VALIDATE PASSWORD component?
Press y|Y for Yes, any other key for No: No
Using existing password for root.
Change the password for root ? ((Press y|Y for Yes, any other key for No) : Y
New password:
Re-enter new password:
By default, a MySQL installation has an anonymous user,
allowing anyone to log into MySQL without having to have
a user account created for them. This is intended only for
testing, and to make the installation go a bit smoother.
You should remove them before moving into a production
environment.
Remove anonymous users? (Press y|Y for Yes, any other key for No) : Y
Success.
Normally, root should only be allowed to connect from
'localhost'. This ensures that someone cannot guess at
the root password from the network.
Disallow root login remotely? (Press y|Y for Yes, any other key for No) : No
... skipping.
By default, MySQL comes with a database named 'test' that
anyone can access. This is also intended only for testing,
and should be removed before moving into a production
environment.
Remove test database and access to it? (Press y|Y for Yes, any other key for No) : Y
Dropping test database...
Success.
Removing privileges on test database...
Success.
Reloading the privilege tables will ensure that all changes
made so far will take effect immediately.
Reload privilege tables now? (Press y|Y for Yes, any other key for No) : Y
Success.
All done!
重启MySQL
\# mysqladmin shutdown -uroot -p -S /data/mysql/mysql.sock
\# nohup mysqld_safe --defaults-file=/etc/my.cnf --user=mysql --basedir=/opt/freeware --datadir=/data/mysql &
登录MySQL验证
\# echo 'show databases;' | mysql -u root -p'xxxxxxxx'
mysql: [Warning] Using a password on the command line interface can be insecure.
Database
information_schema
mysql
performance_schema
sys
\--------------------------------------------------------------
\-------------------------------- MySQL 5.1 部分分割线 ---------
\--------------------------------------------------------------
MySQL 5.1可以平稳运行在AIX 5.3, 6.1, 7.1, 7.2各个版本中。 下面简单说明如何AIX 7.2中安装、使用和验证 MySQL 5.1.66。
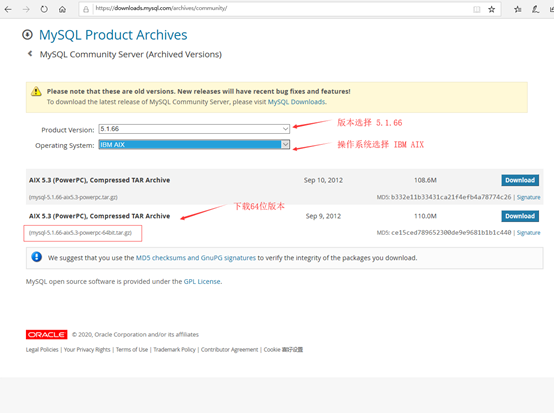
- 从MySQL官网社区archive中下载 MySQL 5.1.66
https://downloads.mysql.com/archives/get/p/23/file/mysql-5.1.66-aix5.3-powerpc-64bit.tar.gz
解压 mysql 软件包
$ gzip -d mysql-5.1.66-aix5.3-powerpc-64bit.tar.gz
$ tar xf mysql-5.1.66-aix5.3-powerpc-64bit.tar
$ mv /home/mysql-5.1.66-aix5.3-powerpc-64bit /opt/mysql5166
创建 mysql 用户
mkgroup -'a' id='600' admin=false projects='System' mysql
mkuser id=601 admin=true pgrp=mysql groups=mysql admgroups=mysql home=/home/mysql shell=/usr/bin/ksh mysql
chown -R mysql:mysql /home/mysql
mkdir -p /home/data
chown -R mysql:mysql /home/data; chown -R mysql:mysql /opt/mysql5166
准备 my.cnf 文件
\# cat /etc/my.cnf
[client]
port = 3306
socket = /tmp/mysql.sock
default-character-set = gbk
[mysqld]
socket = /tmp/mysql.sock
\#explicit_defaults_for_timestamp=true
basedir=/opt/mysql5166
user=mysql
\#skip_grant_tables=1
\#sql_mode=STRICT_TRANS_TABLES,NO_ZERO_IN_DATE,NO_ZERO_DATE,ERROR_FOR_DIVISION_BY_ZERO,NO_AUTO_CREATE_USER,NO_ENGINE_SUBSTITUTION
\#sql_mode=NO_ENGINE_SUBSTITUTION,STRICT_TRANS_TABLES
\#innodb_buffer_pool_size: InnDB 存储引擎缓存表和索引数据所使用的内存大小。默认值是 128MB 。在以 InnDB 存储引擎为主的系统中,可以将这个参数设为机器物理内存的 80% 。
\#innodb_buffer_pool_size = 128M
innodb_buffer_pool_size = 2G
innodb_file_per_table=1
\#innodb_buffer_pool_instances InnoDB 缓存池被分成的区域数 , 将缓存分成多个部分可以提高 MySQL 服务的并发性,减少不同线程读缓存页的读写竞争 , 这个参数只有将 innodb_buffer_pool_size 参数设为 1GB 或以上时才生效。建议将每个分成的内存区域设为 1GB 大小。
\#innodb_buffer_pool_instances = 1
\# 是否启用 bin log
disable_log_bin
bulk_insert_buffer_size = 200M
skip_name_resolve
character_set_server = gbk
init_connect='SET NAMES gbk'
lower_case_table_names=1
log-bin-trust-function-creators=1
\#default_authentication_plugin=mysql_native_password
slow_query_log=1
long_query_time=8
max_connections = 4000
max_connect_errors = 1000
interactive_timeout = 600
wait_timeout = 300
datadir=/home/data
log-error=/home/data/mysqld.log
pid-file=/home/data/mysqld.pid
- 初始化 MySQL
$ su- mysql
$ export PATH=/opt/mysql5166/bin:$PATH
$ /opt/mysql5166/scripts/mysql_install_db --defaults-file=/etc/my.cnf --user=mysql --basedir=/opt/mysql5166 --datadir=/home/data
输出如下:
Installing MySQL system tables...
OK
Filling help tables...
OK
To start mysqld at boot time you have to copy
support-files/mysql.server to the right place for your system
PLEASE REMEMBER TO SET A PASSWORD FOR THE MySQL root USER !
To do so, start the server, then issue the following commands:
/opt/mysql5166/bin/mysqladmin -u root password 'new-password'
/opt/mysql5166/bin/mysqladmin -u root -h racnode01 password 'new-password'
Alternatively you can run:
/opt/mysql5166/bin/mysql_secure_installation
which will also give you the option of removing the test
databases and anonymous user created by default. This is
strongly recommended for production servers.
See the manual for more instructions.
You can start the MySQL daemon with:
cd /opt/mysql5166 ; /opt/mysql5166/bin/mysqld_safe &
You can test the MySQL daemon with mysql-test-run.pl
cd /opt/mysql5166/mysql-test ; perl mysql-test-run.pl
Please report any problems with the /opt/mysql5166/scripts/mysqlbug script!
$ /opt/mysql5166/bin/mysqld_safe &
$ /opt/mysql5166/bin/mysqladmin -u root password 'rootroot’
$ /opt/mysql5166/bin/mysql_secure_installation
NOTE: RUNNING ALL PARTS OF THIS SCRIPT IS RECOMMENDED FOR ALL MySQL
SERVERS IN PRODUCTION USE! PLEASE READ EACH STEP CAREFULLY!
In order to log into MySQL to secure it, we'll need the current
password for the root user. If you've just installed MySQL, and
you haven't set the root password yet, the password will be blank,
so you should just press enter here.
Enter current password for root (enter for none):
OK, successfully used password, moving on...
Setting the root password ensures that nobody can log into the MySQL
root user without the proper authorisation.
You already have a root password set, so you can safely answer 'n'.
Change the root password? [Y/n] n
... skipping.
By default, a MySQL installation has an anonymous user, allowing anyone
to log into MySQL without having to have a user account created for
them. This is intended only for testing, and to make the installation
go a bit smoother. You should remove them before moving into a
production environment.
Remove anonymous users? [Y/n] Y
... Success!
Normally, root should only be allowed to connect from 'localhost'. This
ensures that someone cannot guess at the root password from the network.
Disallow root login remotely? [Y/n] n
... skipping.
By default, MySQL comes with a database named 'test' that anyone can
access. This is also intended only for testing, and should be removed
before moving into a production environment.
Remove test database and access to it? [Y/n] Y
Dropping test database...
... Success!
Removing privileges on test database...
... Success!
Reloading the privilege tables will ensure that all changes made so far
will take effect immediately.
Reload privilege tables now? [Y/n] Y
... Success!
Cleaning up...
All done! If you've completed all of the above steps, your MySQL
installation should now be secure.
Thanks for using MySQL!
$ mysqladmin shutdown -uroot -prootroot -S /tmp/mysql.sock
- 启 / 停 / 连接 MySQL 验证
启动
$ cd /opt/mysql5166 ;
$ nohup mysqld --defaults-file=/etc/my.cnf --user=mysql &
停止
$ mysqladmin shutdown -uroot -prootroot -S /tmp/mysql.sock
重新启动
$ nohup mysqld --defaults-file=/etc/my.cnf --user=mysql &
修改 root 密码及权限
$ /opt/mysql5166/bin/mysqladmin -u root password 'xxxxxxxx'
$ mysql -u root -p -S /tmp/mysql.sock
CREATE USER 'root'@'%' IDENTIFIED BY 'xxxxxxxx';
GRANT ALL ON . TO 'root'@'%' WITH GRANT OPTION;
FLUSH PRIVILEGES;
输出如下 :
mysql> ALTER USER 'root'@'localhost' IDENTIFIED BY 'rootroot';
ERROR 1064 (42000): You have an error in your SQL syntax; check the manual that corresponds to your MySQL server version for the right syntax to use near 'USER 'root'@'localhost' IDENTIFIED BY 'rootroot'' at line 1
mysql> CREATE USER 'root'@'%' IDENTIFIED BY 'rootroot';
Query OK, 0 rows affected (0.00 sec)
mysql> GRANT ALL ON . TO 'root'@'%' WITH GRANT OPTION;
Query OK, 0 rows affected (0.00 sec)
mysql> FLUSH PRIVILEGES;
Query OK, 0 rows affected (0.00 sec)
连接 MySQL 验证
$ echo 'show databases;' | mysql -u root -p'rootroot'
Database
information_schema
mysql
- 高可用方案
生产系统中,如果连SAN共享存储可以采用PowerHA 方案 ,非共享存储可以采用MySQL主/从复制方案,来实现 AIX 7.2上MySQL的数据库高可用。详细实现步骤本文不赘述。 - 附录
本文示例和安装包同步存放在 [https://github.com/powerfans/MySQL_for_AIX]
如果觉得我的文章对您有用,请点赞。您的支持将鼓励我继续创作!
赞1作者其他文章
评论 0 · 赞 2
评论 1 · 赞 2
评论 0 · 赞 0
评论 0 · 赞 1
评论 0 · 赞 1
添加新评论0 条评论