Linux部署Redis5.07集群
Linux部署Redis5.07集群
一、环境介绍
节点名称    端口号    是主是从    所属主节点
redis-6379    6379    主节点
redis-6389    6389    从节点    redis-6379
redis-6380    6380    主节点
redis-6390    6390    从节点    redis-6380
redis-6381    6381    主节点
redis-6391    6391    从节点    redis-6381
192.168.2.1 centos7.7 redis端口 6379 6390 6381
192.168.2.2 centos7.7 redis端口 6389 6380 6391[root@localhost ~]# cat /etc/hosts|grep 192
192.168.2.1 redis-6379 redis-6390 redis-6381
192.168.2.2 redis-6389 redis-6380 redis-6391
二、安装redis
1、安装gcc
yum install gcc2、把下载好的redis-5.0.7.tar.gz放在/usr/src文件夹下,并解压
[root@localhost ~]# cd /usr/src/
[root@localhost src]# wget http://download.redis.io/releases/redis-5.0.7.tar.gz
[root@localhost src]# scp redis-5.0.7.tar.gz root@192.168.2.2:/usr/src
[root@localhost src]# tar -zxvf redis-5.0.7.tar.gz
[root@localhost src]# ssh 192.168.2.2 "cd /usr/src ;tar -zxvf redis-5.0.7.tar.gz"
3 、创建redis各实例目录
[root@localhost src]# mkdir -p /usr/local/redis-cluster
[root@localhost src]# cd /usr/local/redis-cluster
[root@localhost redis-cluster]# mkdir conf data log
[root@localhost redis-cluster]# mkdir -p data/redis-6379 data/redis-6390 data/redis-6381
[root@localhost redis-cluster]# ssh 192.168.2.2 "mkdir -p /usr/local/redis-cluster;cd /usr/local/redis-cluster;mkdir conf data log;mkdir -p data/redis-6389 data/redis-6380 data/redis-6391"
4、redis配置文件管理
根据以下 模板 配置各个实例的 redis.conf,以下只是搭建集群需要的 基本配置,可能需要根据实际情况做修改。
# redis后台运行
daemonize yes
# 绑定的主机端口
bind 127.0.0.1
# 数据存放目录
dir /usr/local/redis-cluster/data/redis-6379
# 进程文件
pidfile /var/run/redis-cluster/${自定义}.pid
# 日志文件 logfile /usr/local/redis-cluster/log/${自定义}.log
# 端口号
port 6379
# 开启集群模式,把注释#去掉
cluster-enabled yes
# 集群的配置,配置文件首次启动自动生成
cluster-config-file /usr/local/redis-cluster/conf/${自定义}.conf
# 请求超时,设置10秒
cluster-node-timeout 10000
# aof日志开启,有需要就开启,它会每次写操作都记录一条日志
appendonly yes
· redis-6379.conf
[root@localhost redis-cluster]# cd conf/
[root@localhost conf]# cat redis-6379.conf
daemonize yes
bind redis-6379
dir /usr/local/redis-cluster/data/redis-6379
pidfile /var/run/redis-cluster/redis-6379.pid
logfile /usr/local/redis-cluster/log/redis-6379.log
port 6379
cluster-enabled yes
cluster-config-file /usr/local/redis-cluster/conf/node-6379.conf
cluster-node-timeout 10000
appendonly yes
· redis-6390.conf
[root@localhost conf]# cp redis-6379.conf redis-6390.conf;sed -i 's/6379/6390/g' redis-6390.conf· redis-6381.conf
[root@localhost conf]# cp redis-6379.conf redis-6381.conf;sed -i 's/6379/6381/g' redis-6381.conf· redis-6389.conf
[root@localhost conf]# scp redis-6379.conf 192.168.2.2:/usr/local/redis-cluster/conf/redis-6389.conf
[root@localhost conf]# ssh 192.168.2.2 "sed -i 's/6379/6389/g' /usr/local/redis-cluster/conf/redis-6389.conf"
· redis-6380.conf
[root@localhost conf]# scp redis-6390.conf 192.168.2.2:/usr/local/redis-cluster/conf/redis-6380.conf
[root@localhost conf]# ssh 192.168.2.2 "sed -i 's/6390/6380/g' /usr/local/redis-cluster/conf/redis-6380.conf"
· redis-6391.conf
[root@localhost conf]# scp redis-6381.conf 192.168.2.2:/usr/local/redis-cluster/conf/redis-6391.conf
[root@localhost conf]# ssh 192.168.2.2 "sed -i 's/6381/6391/g' /usr/local/redis-cluster/conf/redis-6391.conf"
5、编译安装redis
[root@localhost conf]# cd /usr/src/redis-5.0.7
[root@localhost redis-5.0.7]# make;make install PREFIX=/usr/local/redis-cluster
[root@localhost redis-5.0.7]# ssh 192.168.2.2 "cd /usr/src/redis-5.0.7;ake;make install PREFIX=/usr/local/redis-cluster"
6、 安装集群
启动redis服务节点
启动完成后,redis 以集群模式启动,查看各个 redis 节点的进程状态:[root@localhost redis-5.0.7]# cd /usr/local/redis-cluster/bin/ [root@localhost bin]# ./redis-server ../conf/redis-6379.conf [root@localhost bin]# ./redis-server ../conf/redis-6381.conf [root@localhost bin]# ./redis-server ../conf/redis-6390.conf [root@localhost bin]# ps -ef|grep redis|grep -v grep root 19455 1 0 02:58 ? 00:00:00 ./redis-server redis-6379:6379 [cluster] root 19460 1 0 02:58 ? 00:00:00 ./redis-server redis-6381:6381 [cluster] root 19465 1 0 02:58 ? 00:00:00 ./redis-server redis-6390:6390 [cluster] [root@localhost bin]# ssh 192.168.2.2 "cd /usr/local/redis-cluster/bin/;./redis-server ../conf/redis-6389.conf;./redis-server ../conf/redis-6391.conf;./redis-server ../conf/redis-6380.conf;ps -ef|grep redis|grep -v grep" root 9365 1 0 03:01 ? 00:00:00 ./redis-server redis-6389:6389 [cluster] root 9367 1 0 03:01 ? 00:00:00 ./redis-server redis-6391:6391 [cluster] root 9372 1 0 03:01 ? 00:00:00 ./redis-server redis-6380:6380 [cluster]在每个 redis 节点的 redis.conf 文件中,我们都配置了 cluster-config-file 的文件路径,集群启动时,conf 目录会新生成 集群 节点配置文件。查看文件列表如下:
[root@localhost bin]# tree ../conf/ ../conf/ ├── node-6379.conf ├── node-6381.conf ├── node-6390.conf ├── redis-6379.conf ├── redis-6381.conf- directories, 6 files
[root@localhost bin]# ssh 192.168.2.2 "tree /usr/local/redis-cluster/conf"
/usr/local/redis-cluster/conf
├── node-6380.conf
├── node-6389.conf
├── node-6391.conf
├── redis-6380.conf
├── redis-6389.conf
└── redis-6391.conf directories, 6 files
关联集群节点
Redis Cluster 在5.0之后取消了ruby脚本 redis-trib.rb的支持(手动命令行添加集群的方式不变),集合到redis-cli里,避免了再安装ruby的相关环境。直接使用redis-clit的参数- -cluster 来取代。为方便自己后面查询就说明下如何使用该命令进行Cluster的创建和管理,关于Cluster的相关说明可以查看官网或则Redis Cluster部署、管理和测试.
Redis Cluster最低要求是3个主节点
① 创建集群主节点[root@localhost bin]# ./redis-cli --cluster create 192.168.2.1:6379 192.168.2.2:6380 192.168.2.1:6381 >>> Performing hash slots allocation on 3 nodes... Master[0] -> Slots 0 - 5460 Master[1] -> Slots 5461 - 10922 Master[2] -> Slots 10923 - 16383 M: 43b3f7a239a034a4465eda55c32b41f703857fac 192.168.2.1:6379 slots:[0-5460] (5461 slots) master M: 5ba58590941bc725a8e2bf507b940cc7a7164765 192.168.2.2:6380 slots:[5461-10922] (5462 slots) master M: 64773cb4cc24c4f23ac97f900095121075a54dd8 192.168.2.1:6381 slots:[10923-16383] (5461 slots) master Can I set the above configuration? (type 'yes' to accept): yes >>> Nodes configuration updated >>> Assign a different config epoch to each node >>> Sending CLUSTER MEET messages to join the cluster Waiting for the cluster to join . >>> Performing Cluster Check (using node 192.168.2.1:6379) M: 43b3f7a239a034a4465eda55c32b41f703857fac 192.168.2.1:6379 slots:[0-5460] (5461 slots) master M: 5ba58590941bc725a8e2bf507b940cc7a7164765 192.168.2.2:6380 slots:[5461-10922] (5462 slots) master M: 64773cb4cc24c4f23ac97f900095121075a54dd8 192.168.2.1:6381 slots:[10923-16383] (5461 slots) master [OK] All nodes agree about slots configuration. >>> Check for open slots... >>> Check slots coverage... [OK] All 16384 slots covered.② 创建集群主从节点
[root@localhost bin]# ./redis-cli --cluster create 192.168.2.1:6379 192.168.2.2:6380 192.168.2.1:6381 192.168.2.1:6390 192.168.2.2:6389 192.168.2.2:6391 --cluster-replicas 1 >>> Performing hash slots allocation on 6 nodes... Master[0] -> Slots 0 - 5460 Master[1] -> Slots 5461 - 10922 Master[2] -> Slots 10923 - 16383 Adding replica 192.168.2.2:6391 to 192.168.2.1:6379 Adding replica 192.168.2.1:6390 to 192.168.2.2:6380 Adding replica 192.168.2.2:6389 to 192.168.2.1:6381 M: c6b246545c3fd674fd5f60acea3066204101e9be 192.168.2.1:6379 slots:[0-5460] (5461 slots) master M: 84ed8c6ce96f215fb76dfc0ae50da267a81c5def 192.168.2.2:6380 slots:[5461-10922] (5462 slots) master M: 8c851d24e293f00fb93b9b16a3fd962c9b6f7a04 192.168.2.1:6381 slots:[10923-16383] (5461 slots) master S: 22f2177274ebf2b598902ca28e3773575bd0d8b0 192.168.2.1:6390 replicates 84ed8c6ce96f215fb76dfc0ae50da267a81c5def S: d88dccc21618301598831eee8869152338637cbf 192.168.2.2:6389 replicates 8c851d24e293f00fb93b9b16a3fd962c9b6f7a04 S: 4813e27260fc9456c058e8ac846496837a1b3fda 192.168.2.2:6391 replicates c6b246545c3fd674fd5f60acea3066204101e9be Can I set the above configuration? (type 'yes' to accept): yes >>> Nodes configuration updated >>> Assign a different config epoch to each node >>> Sending CLUSTER MEET messages to join the cluster Waiting for the cluster to join .... >>> Performing Cluster Check (using node 192.168.2.1:6379) M: c6b246545c3fd674fd5f60acea3066204101e9be 192.168.2.1:6379- additional replica(s)
S: 4813e27260fc9456c058e8ac846496837a1b3fda 192.168.2.2:6391
slots: (0 slots) slave
replicates c6b246545c3fd674fd5f60acea3066204101e9be
S: 22f2177274ebf2b598902ca28e3773575bd0d8b0 192.168.2.1:6390
slots: (0 slots) slave
replicates 84ed8c6ce96f215fb76dfc0ae50da267a81c5def
S: d88dccc21618301598831eee8869152338637cbf 192.168.2.2:6389
slots: (0 slots) slave
replicates 8c851d24e293f00fb93b9b16a3fd962c9b6f7a04
M: 8c851d24e293f00fb93b9b16a3fd962c9b6f7a04 192.168.2.1:6381
slots:[10923-16383] (5461 slots) master - additional replica(s)
M: 84ed8c6ce96f215fb76dfc0ae50da267a81c5def 192.168.2.2:6380
slots:[5461-10922] (5462 slots) master additional replica(s)
[OK] All nodes agree about slots configuration.Check for open slots...
Check slots coverage...
[OK] All 16384 slots covered.说明:--cluster-replicas 参数为数字,1表示每个主节点需要1个从节点。 通过该方式创建的带有从节点的机器不能够自己手动指定主节点,所以如果需要指定的话,需要自己手动指定,先使用①创建好主节点后,再通过④ 来处理。 ③ 添加集群主节点[root@localhost bin]# ./redis-cli --cluster add-node 192.168.2.1:6382 192.168.2.1:6379
Adding node 192.168.2.1:6382 to cluster 192.168.2.1:6379
Performing Cluster Check (using node 192.168.2.1:6379)
M: c6b246545c3fd674fd5f60acea3066204101e9be 192.168.2.1:6379
slots:[0-5460] (5461 slots) master- additional replica(s)
S: 4813e27260fc9456c058e8ac846496837a1b3fda 192.168.2.2:6391
slots: (0 slots) slave
replicates c6b246545c3fd674fd5f60acea3066204101e9be
S: 22f2177274ebf2b598902ca28e3773575bd0d8b0 192.168.2.1:6390
slots: (0 slots) slave
replicates 84ed8c6ce96f215fb76dfc0ae50da267a81c5def
S: d88dccc21618301598831eee8869152338637cbf 192.168.2.2:6389
slots: (0 slots) slave
replicates 8c851d24e293f00fb93b9b16a3fd962c9b6f7a04
M: 8c851d24e293f00fb93b9b16a3fd962c9b6f7a04 192.168.2.1:6381
slots:[10923-16383] (5461 slots) master - additional replica(s)
M: 84ed8c6ce96f215fb76dfc0ae50da267a81c5def 192.168.2.2:6380
slots:[5461-10922] (5462 slots) master additional replica(s)
[OK] All nodes agree about slots configuration.Check for open slots...
Check slots coverage...
[OK] All 16384 slots covered.
Send CLUSTER MEET to node 192.168.2.1:6382 to make it join the cluster.
[OK] New node added correctly.说明:为一个指定集群添加节点,需要先连到该集群的任意一个节点IP(192.168.2.1:6379),再把新节点加入。该2个参数的顺序有要求:新加入的节点放前 ④为节点分配slot[root@localhost bin]# ./redis-cli --cluster reshard 192.168.2.1:6382
Performing Cluster Check (using node 192.168.2.1:6382)
M: c4e8529979ceb4741eb5df2c5cc6e22944411b60 192.168.2.1:6382
slots: (0 slots) master
M: c6b246545c3fd674fd5f60acea3066204101e9be 192.168.2.1:6379
slots:[0-5460] (5461 slots) master- additional replica(s)
S: 4813e27260fc9456c058e8ac846496837a1b3fda 192.168.2.2:6391
slots: (0 slots) slave
replicates c6b246545c3fd674fd5f60acea3066204101e9be
M: 8c851d24e293f00fb93b9b16a3fd962c9b6f7a04 192.168.2.1:6381
slots:[10923-16383] (5461 slots) master - additional replica(s)
S: 22f2177274ebf2b598902ca28e3773575bd0d8b0 192.168.2.1:6390
slots: (0 slots) slave
replicates 84ed8c6ce96f215fb76dfc0ae50da267a81c5def
S: d88dccc21618301598831eee8869152338637cbf 192.168.2.2:6389
slots: (0 slots) slave
replicates 8c851d24e293f00fb93b9b16a3fd962c9b6f7a04
M: 84ed8c6ce96f215fb76dfc0ae50da267a81c5def 192.168.2.2:6380
slots:[5461-10922] (5462 slots) master additional replica(s)
[OK] All nodes agree about slots configuration.Check for open slots...
Check slots coverage...
[OK] All 16384 slots covered.
How many slots do you want to move (from 1 to 16384)? 500 #分配多少slot给节点
What is the receiving node ID? c4e8529979ceb4741eb5df2c5cc6e22944411b60 #接收这些slot的nodeID
Please enter all the source node IDs.
Type 'all' to use all the nodes as source nodes for the hash slots.
Type 'done' once you entered all the source nodes IDs.
Source node #1: 8c851d24e293f00fb93b9b16a3fd962c9b6f7a04 #从原有集群哪个节点上分配
Source node #2: done #结束
Ready to move 500 slots.
Source nodes:
M: 8c851d24e293f00fb93b9b16a3fd962c9b6f7a04 192.168.2.1:6381
slots:[10923-16383] (5461 slots) masteradditional replica(s)
Destination node:
M: c4e8529979ceb4741eb5df2c5cc6e22944411b60 192.168.2.1:6382
slots: (0 slots) master
Resharding plan:
Moving slot 10923 from 8c851d24e293f00fb93b9b16a3fd962c9b6f7a04⑤添加集群从节点
[root@localhost bin]# ./redis-cli --cluster add-node 192.168.2.2:6392 192.168.2.1:6379 --cluster-slave --cluster-master-id c4e8529979ceb4741eb5df2c5cc6e22944411b60

>>> Adding node 192.168.2.2:6392 to cluster 192.168.2.1:6379
>>> Performing Cluster Check (using node 192.168.2.1:6379)
M: c6b246545c3fd674fd5f60acea3066204101e9be 192.168.2.1:6379
slots:[0-5460] (5461 slots) master
1 additional replica(s)
S: 4813e27260fc9456c058e8ac846496837a1b3fda 192.168.2.2:6391
slots: (0 slots) slave
replicates c6b246545c3fd674fd5f60acea3066204101e9be
S: 22f2177274ebf2b598902ca28e3773575bd0d8b0 192.168.2.1:6390
slots: (0 slots) slave
replicates 84ed8c6ce96f215fb76dfc0ae50da267a81c5def
S: d88dccc21618301598831eee8869152338637cbf 192.168.2.2:6389
slots: (0 slots) slave
replicates 8c851d24e293f00fb93b9b16a3fd962c9b6f7a04
M: 8c851d24e293f00fb93b9b16a3fd962c9b6f7a04 192.168.2.1:6381
slots:[10923-16383] (5461 slots) master
1 additional replica(s)
M: c4e8529979ceb4741eb5df2c5cc6e22944411b60 192.168.2.1:6382
slots: (0 slots) master
M: 84ed8c6ce96f215fb76dfc0ae50da267a81c5def 192.168.2.2:6380
slots:[5461-10922] (5462 slots) master
1 additional replica(s)
[OK] All nodes agree about slots configuration.
>>> Check for open slots...
>>> Check slots coverage...
[OK] All 16384 slots covered.
>>> Send CLUSTER MEET to node 192.168.2.2:6392 to make it join the cluster.
Waiting for the cluster to join
>>> Configure node as replica of 192.168.2.1:6382.
[OK] New node added correctly.
说明:把6392节点加入到6379节点的集群中,并且当做node_id为 c4e8529979ceb4741eb5df2c5cc6e22944411b60 的从节点。如果不指定 --cluster-master-id会随机分配到任意一个主节点。
⑥ 删除一个Slave节点
[root@localhost bin]# ./redis-cli --cluster del-node 192.168.2.2:6392 f8a31ef721495f572eec6dfe06439fff414f0b9b
>>> Removing node f8a31ef721495f572eec6dfe06439fff414f0b9b from cluster 192.168.2.2:6392
>>> Sending CLUSTER FORGET messages to the cluster...
>>> SHUTDOWN the node.
说明:指定IP、端口和node_id 来删除一个节点,从节点可以直接删除,主节点不能直接删除,删除之后,该节点会被shutdown.
⑦ 删除一个Master节点
删除master节点之前首先要使用reshard移除master的全部slot,然后再删除当前节点(目前只能把被删除master的slot迁移到一个节点上)
[root@localhost bin]# ./redis-cli --cluster reshard 192.168.2.1:6382
>>> Performing Cluster Check (using node 192.168.2.1:6382)
M: c4e8529979ceb4741eb5df2c5cc6e22944411b60 192.168.2.1:6382
slots:[10923-11422] (500 slots) master
M: c6b246545c3fd674fd5f60acea3066204101e9be 192.168.2.1:6379
slots:[0-5460] (5461 slots) master
1 additional replica(s)
S: 4813e27260fc9456c058e8ac846496837a1b3fda 192.168.2.2:6391
slots: (0 slots) slave
replicates c6b246545c3fd674fd5f60acea3066204101e9be
M: 8c851d24e293f00fb93b9b16a3fd962c9b6f7a04 192.168.2.1:6381
slots:[11423-16383] (4961 slots) master
1 additional replica(s)
S: 22f2177274ebf2b598902ca28e3773575bd0d8b0 192.168.2.1:6390
slots: (0 slots) slave
replicates 84ed8c6ce96f215fb76dfc0ae50da267a81c5def
S: d88dccc21618301598831eee8869152338637cbf 192.168.2.2:6389
slots: (0 slots) slave
replicates 8c851d24e293f00fb93b9b16a3fd962c9b6f7a04
M: 84ed8c6ce96f215fb76dfc0ae50da267a81c5def 192.168.2.2:6380
slots:[5461-10922] (5462 slots) master
1 additional replica(s)
[OK] All nodes agree about slots configuration.
>>> Check for open slots...
>>> Check slots coverage...
[OK] All 16384 slots covered.
How many slots do you want to move (from 1 to 16384)? 500
What is the receiving node ID? 8c851d24e293f00fb93b9b16a3fd962c9b6f7a04
Please enter all the source node IDs.
Type 'all' to use all the nodes as source nodes for the hash slots.
Type 'done' once you entered all the source nodes IDs.
Source node #1: c4e8529979ceb4741eb5df2c5cc6e22944411b60
Source node #2: done
删除空master节点
[root@localhost bin]# ./redis-cli --cluster del-node 192.168.2.1:6382 c4e8529979ceb4741eb5df2c5cc6e22944411b60
>>> Removing node c4e8529979ceb4741eb5df2c5cc6e22944411b60 from cluster 192.168.2.1:6382
>>> Sending CLUSTER FORGET messages to the cluster...
>>> SHUTDOWN the node.
[root@localhost bin]# ps -ef|grep redis-6382
root 2286 2065 0 22:11 pts/1 00:00:00 grep --color=auto redis-6382
[root@localhost bin]# ps -ef|grep redis
root 2188 1 0 20:29 ? 00:00:08 ./redis-server redis-6379:6379 [cluster]
root 2193 1 0 20:29 ? 00:00:09 ./redis-server redis-6381:6381 [cluster]
root 2198 1 0 20:29 ? 00:00:08 ./redis-server redis-6390:6390 [cluster]
root 2288 2065 0 22:11 pts/1 00:00:00 grep --color=auto redis
注意:当被删除掉的节点重新起来之后不能自动加入集群,但其和主的复制还是正常的,也可以通过该节点看到集群信息(通过其他正常节点已经看不到该被del-node节点的信息)。
如果想要再次加入集群,则需要先在该节点执行cluster reset,再用add-node进行添加,进行增量同步复制。
到此,目前整个集群的状态如下:
[root@localhost bin]# ./redis-cli -c -h 192.168.2.1 -p 6379
192.168.2.1:6379> cluster nodes
4813e27260fc9456c058e8ac846496837a1b3fda 192.168.2.2:6391@16391 slave c6b246545c3fd674fd5f60acea3066204101e9be 0 1574910815000 6 connected
22f2177274ebf2b598902ca28e3773575bd0d8b0 192.168.2.1:6390@16390 slave 84ed8c6ce96f215fb76dfc0ae50da267a81c5def 0 1574910819105 4 connected
c6b246545c3fd674fd5f60acea3066204101e9be 192.168.2.1:6379@16379 myself,master - 0 1574910816000 1 connected 0-5460
d88dccc21618301598831eee8869152338637cbf 192.168.2.2:6389@16389 slave 8c851d24e293f00fb93b9b16a3fd962c9b6f7a04 0 1574910818099 8 connected
8c851d24e293f00fb93b9b16a3fd962c9b6f7a04 192.168.2.1:6381@16381 master - 0 1574910816089 8 connected 10923-16383
84ed8c6ce96f215fb76dfc0ae50da267a81c5def 192.168.2.2:6380@16380 master - 0 1574910817094 2 connected 5461-10922
3、 检查集群
[root@localhost bin]# ./redis-cli --cluster check 192.168.2.1:6379 --cluster-search-multiple-owners
192.168.2.1:6379 (c6b24654...) -> 0 keys | 5461 slots | 1 slaves.
192.168.2.1:6381 (8c851d24...) -> 0 keys | 5461 slots | 1 slaves.
192.168.2.2:6380 (84ed8c6c...) -> 0 keys | 5462 slots | 1 slaves.
[OK] 0 keys in 3 masters.
0.00 keys per slot on average.
>>> Performing Cluster Check (using node 192.168.2.1:6379)
M: c6b246545c3fd674fd5f60acea3066204101e9be 192.168.2.1:6379
slots:[0-5460] (5461 slots) master
1 additional replica(s)
S: 4813e27260fc9456c058e8ac846496837a1b3fda 192.168.2.2:6391
slots: (0 slots) slave
replicates c6b246545c3fd674fd5f60acea3066204101e9be
S: 22f2177274ebf2b598902ca28e3773575bd0d8b0 192.168.2.1:6390
slots: (0 slots) slave
replicates 84ed8c6ce96f215fb76dfc0ae50da267a81c5def
S: d88dccc21618301598831eee8869152338637cbf 192.168.2.2:6389
slots: (0 slots) slave
replicates 8c851d24e293f00fb93b9b16a3fd962c9b6f7a04
M: 8c851d24e293f00fb93b9b16a3fd962c9b6f7a04 192.168.2.1:6381
slots:[10923-16383] (5461 slots) master
1 additional replica(s)
M: 84ed8c6ce96f215fb76dfc0ae50da267a81c5def 192.168.2.2:6380
slots:[5461-10922] (5462 slots) master
1 additional replica(s)
[OK] All nodes agree about slots configuration.
>>> Check for open slots...
>>> Check slots coverage...
[OK] All 16384 slots covered.
>>> Check for multiple slot owners...
4、集群信息查看
[root@localhost bin]# ./redis-cli --cluster info 192.168.2.1:6379
192.168.2.1:6379 (c6b24654...) -> 0 keys | 5461 slots | 1 slaves.
192.168.2.1:6381 (8c851d24...) -> 0 keys | 5461 slots | 1 slaves.
192.168.2.2:6380 (84ed8c6c...) -> 0 keys | 5462 slots | 1 slaves.
[OK] 0 keys in 3 masters.
0.00 keys per slot on average.
5、修复集群
[root@localhost bin]# ./redis-cli --cluster fix 192.168.2.1:6379 --cluster-search-multiple-owners
192.168.2.1:6379 (c6b24654...) -> 0 keys | 5461 slots | 1 slaves.
192.168.2.1:6381 (8c851d24...) -> 0 keys | 5461 slots | 1 slaves.
192.168.2.2:6380 (84ed8c6c...) -> 0 keys | 5462 slots | 1 slaves.
[OK] 0 keys in 3 masters.
0.00 keys per slot on average.
>>> Performing Cluster Check (using node 192.168.2.1:6379)
M: c6b246545c3fd674fd5f60acea3066204101e9be 192.168.2.1:6379
slots:[0-5460] (5461 slots) master
1 additional replica(s)
S: 4813e27260fc9456c058e8ac846496837a1b3fda 192.168.2.2:6391
slots: (0 slots) slave
replicates c6b246545c3fd674fd5f60acea3066204101e9be
S: 22f2177274ebf2b598902ca28e3773575bd0d8b0 192.168.2.1:6390
slots: (0 slots) slave
replicates 84ed8c6ce96f215fb76dfc0ae50da267a81c5def
S: d88dccc21618301598831eee8869152338637cbf 192.168.2.2:6389
slots: (0 slots) slave
replicates 8c851d24e293f00fb93b9b16a3fd962c9b6f7a04
M: 8c851d24e293f00fb93b9b16a3fd962c9b6f7a04 192.168.2.1:6381
slots:[10923-16383] (5461 slots) master
1 additional replica(s)
M: 84ed8c6ce96f215fb76dfc0ae50da267a81c5def 192.168.2.2:6380
slots:[5461-10922] (5462 slots) master
1 additional replica(s)
[OK] All nodes agree about slots configuration.
>>> Check for open slots...
>>> Check slots coverage...
[OK] All 16384 slots covered.
>>> Check for multiple slot owners...
说明:修复集群和槽的重复分配问题
6、 设置集群的超时时间
[root@localhost bin]# ./redis-cli --cluster set-timeout 192.168.2.1:6379 10000
>>> Reconfiguring node timeout in every cluster node...
*** New timeout set for 192.168.2.1:6379
*** New timeout set for 192.168.2.2:6391
*** New timeout set for 192.168.2.1:6390
*** New timeout set for 192.168.2.2:6389
*** New timeout set for 192.168.2.1:6381
*** New timeout set for 192.168.2.2:6380
>>> New node timeout set. 6 OK, 0 ERR.
7、 集群中执行相关命令
[root@localhost bin]# ./redis-cli --cluster call 192.168.2.1:6379 config set requirepass mima
>>> Calling config set requirepass mima
192.168.2.1:6379: OK
192.168.2.2:6391: OK
192.168.2.1:6390: OK
192.168.2.2:6389: OK
192.168.2.1:6381: OK
192.168.2.2:6380: OK
[root@localhost bin]# ./redis-cli -a mima --cluster call 192.168.2.1:6379 config set masterauth mima
Warning: Using a password with '-a' or '-u' option on the command line interface may not be safe.
>>> Calling config set masterauth mima
192.168.2.1:6379: OK
192.168.2.2:6391: OK
192.168.2.1:6390: OK
192.168.2.2:6389: OK
192.168.2.1:6381: OK
192.168.2.2:6380: OK
[root@localhost bin]# ./redis-cli -a mima --cluster call 192.168.2.1:6379 config rewrite
Warning: Using a password with '-a' or '-u' option on the command line interface may not be safe.
>>> Calling config rewrite
192.168.2.1:6379: OK
192.168.2.2:6391: OK
192.168.2.1:6390: OK
192.168.2.2:6389: OK
192.168.2.1:6381: OK
192.168.2.2:6380: OK
[root@localhost bin]# ./redis-cli --cluster call 192.168.2.1:6381 config set cluster-node-timeout 12000
>>> Calling config set cluster-node-timeout 12000
192.168.2.1:6381: OK
192.168.2.1:6390: OK
192.168.2.1:6379: OK
192.168.2.2:6380: OK
192.168.2.2:6391: OK
192.168.2.2:6389: OK 说明:连接到集群的任意一节点来对整个集群的所有节点进行设置。
7、 迁移
① 在线迁移slot:在线把集群的一些slot从集群原来slot节点迁移到新的节点,即可以完成集群的在线横向扩容和缩容。 有2种方式进行迁移
一是根据提示来进行操作:
    直接连接到集群的任意一节点
    [root@localhost bin]# ./redis-cli -a mima --cluster reshard 192.168.2.1:6379
二是根据参数进行操作:
[root@localhost bin]# ./redis-cli -a mima --cluster reshard 192.168.2.1:6379 --cluster-from 8c851d24e293f00fb93b9b16a3fd962c9b6f7a04 --cluster-to c4e8529979ceb4741eb5df2c5cc6e22944411b60 --cluster-slots 10 --cluster-yes --cluster-timeout 5000 --cluster-pipeline 10 --cluster-replace说明:连接到集群的任意一节点来对指定节点指定数量的slot进行迁移到指定的节点。
② 平衡(rebalance)slot:
1)平衡集群中各个节点的slot数量
[root@localhost bin]# ./redis-cli -a mima --cluster rebalance 192.168.2.1:6379
Warning: Using a password with '-a' or '-u' option on the command line interface may not be safe.
>>> Performing Cluster Check (using node 192.168.2.1:6379)
[OK] All nodes agree about slots configuration.
>>> Check for open slots...
>>> Check slots coverage...
[OK] All 16384 slots covered.
*** No rebalancing needed! All nodes are within the 2.00% threshold.
2)根据集群中各个节点设置的权重等平衡slot数量(不执行,只模拟)
[root@localhost bin]#./redis-cli -a cc --cluster rebalance --cluster-weight 117457eab5071954faab5e81c3170600d5192270=5 815da8448f5d5a304df0353ca10d8f9b77016b28=4 56005b9413cbf225783906307a2631109e753f8f=3 --cluster-simulate 192.168.2.1:6379③ 导入集群
[root@localhost bin]#./redis-cli --cluster import 192.168.2.1:6379 --cluster-from 192.168.2.3:9021 --cluster-replace说明:外部Redis实例(9021)导入到集群中的任意一节点。
注意:测试下来发现参数--cluster-replace没有用,如果集群中已经包含了某个key,在导入的时候会失败,不会覆盖,只有清空集群key才能导入。
    *** Importing 97847 keys from DB 0
    Migrating 9223372011174675807 to 192.168.2.1:6379: Source 192.168.2.3:9021 replied with error:
    ERR Target instance replied with error: BUSYKEY Target key name already exists
并且发现如果集群设置了密码,也会导入失败,需要设置集群密码为空才能进行导入(call)。通过monitor(9021)的时候发现,在migrate的时候需要密码进行auth认证。
三、FAQ 摘抄
在 Redis 3.0 之前,使用 哨兵(sentinel)机制来监控各个节点之间的状态。Redis Cluster 是 Redis 的 分布式解决方案,在 3.0 版本正式推出,有效地解决了 Redis 在 分布式 方面的需求。当遇到 单机内存、并发、流量 等瓶颈时,可以采用 Cluster 架构方案达到 负载均衡 的目的。
将从 集群方案、数据分布、搭建集群、节点通信、集群伸缩、请求路由、故障转移、集群运维 等几个方面介绍 Redis Cluster。
1. Redis集群方案
Redis Cluster 集群模式通常具有 高可用、可扩展性、分布式、容错 等特性。Redis 分布式方案一般有两种:
1.1 客户端分区方案
客户端 就已经决定数据会被 存储 到哪个 redis 节点或者从哪个 redis 节点 读取数据。其主要思想是采用 哈希算法 将 Redis 数据的 key 进行散列,通过 hash 函数,特定的 key会 映射 到特定的 Redis 节点上。
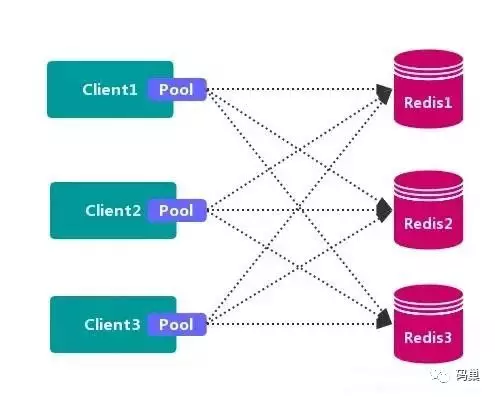
客户端分区方案 的代表为 Redis Sharding,Redis Sharding 是 Redis Cluster 出来之前,业界普遍使用的 Redis 多实例集群 方法。Java 的 Redis 客户端驱动库 Jedis,支持 Redis Sharding 功能,即 ShardedJedis 以及 结合缓存池 的 ShardedJedisPool。
优点
不使用 第三方中间件,分区逻辑 可控,配置 简单,节点之间无关联,容易 线性扩展,灵活性强。
缺点
客户端 无法 动态增删 服务节点,客户端需要自行维护 分发逻辑,客户端之间 无连接共享,会造成 连接浪费。
1.2. 代理分区方案
客户端 发送请求到一个 代理组件,代理 解析 客户端 的数据,并将请求转发至正确的节点,最后将结果回复给客户端。
优点:简化客户端 的分布式逻辑,客户端 透明接入,切换成本低,代理的 转发 和 存储 分离。
缺点:多了一层代理层,加重了 架构部署复杂度 和 性能损耗。
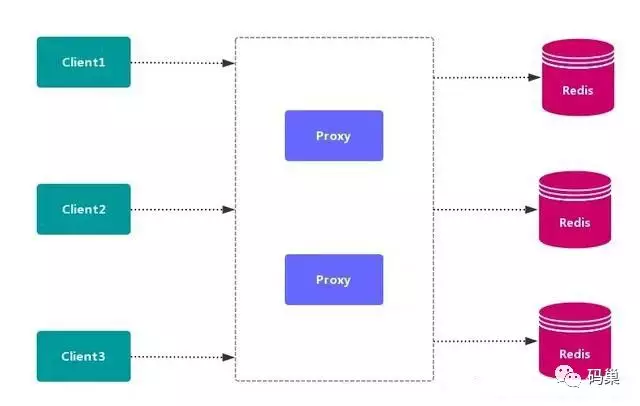
代理分区 主流实现的有方案有 Twemproxy 和 Codis。
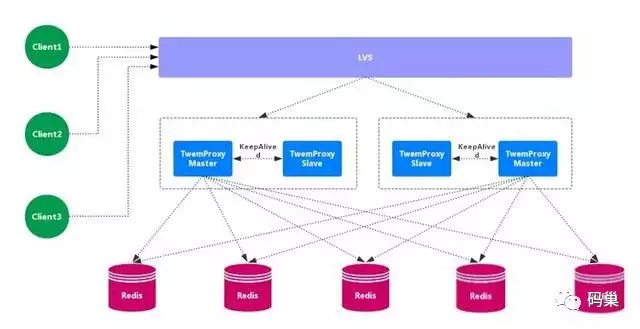
1.2.1. Twemproxy
Twemproxy 也叫 nutcraker,是 twitter 开源的一个 redis 和 memcache 的 中间代理服务器 程序。Twemproxy 作为 代理,可接受来自多个程序的访问,按照 路由规则,转发给后台的各个 Redis 服务器,再原路返回。Twemproxy 存在 单点故障 问题,需要结合 Lvs 和 Keepalived 做 高可用方案。
优点:应用范围广,稳定性较高,中间代理层高可用。
缺点:无法平滑地水平扩容/缩容,无可视化管理界面,运维不友好,出现故障,不能 自动转移。
1.2.2. Codis
Codis 是一个 分布式 Redis 解决方案,对于上层应用来说,连接 Codis-Proxy 和直接连接 原生的 Redis-Server 没有的区别。Codis 底层会 处理请求的转发,不停机的进行 数据迁移 等工作。Codis 采用了无状态的 代理层,对于 客户端 来说,一切都是透明的。 
优点
实现了上层 Proxy 和底层 Redis 的 高可用,数据分片 和 自动平衡,提供 命令行接口 和 RESTful API,提供 监控 和 管理 界面,可以动态 添加 和 删除 Redis 节点。
缺点
部署架构 和 配置 复杂,不支持 跨机房 和 多租户,不支持 鉴权管理。
1.3. 查询路由方案
客户端随机地 请求任意一个 Redis 实例,然后由 Redis 将请求 转发 给 正确 的 Redis 节点。Redis Cluster 实现了一种 混合形式 的 查询路由,但并不是 直接 将请求从一个 Redis 节点 转发 到另一个 Redis 节点,而是在 客户端 的帮助下直接 重定向( redirected)到正确的 Redis 节点。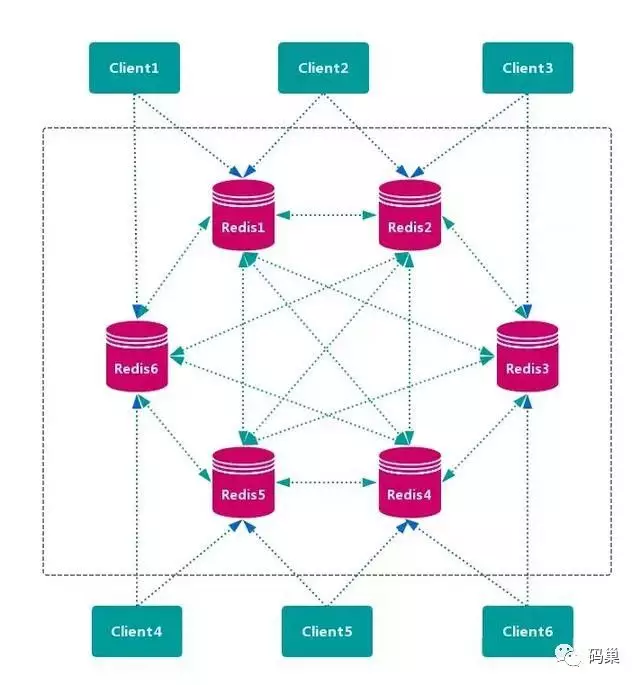
优点
无中心节点,数据按照 槽 存储分布在多个 Redis 实例上,可以平滑的进行节点 扩容/缩容,支持 高可用 和 自动故障转移,运维成本低。
缺点
严重依赖 Redis-trib 工具,缺乏 监控管理,需要依赖 Smart Client (维护连接,缓存路由表,MultiOp 和 Pipeline 支持)。Failover 节点的 检测过慢,不如 中心节点 ZooKeeper 及时。Gossip 消息具有一定开销。无法根据统计区分 冷热数据。
2. 数据分布
2.1. 数据分布理论
分布式数据库 首先要解决把 整个数据集 按照 分区规则 映射到 多个节点 的问题,即把 数据集 划分到 多个节点 上,每个节点负责 整体数据 的一个 子集。
数据分布通常有 哈希分区 和 顺序分区 两种方式。
由于 Redis Cluster 采用 哈希分区规则,这里重点讨论 哈希分区。常见的 哈希分区 规则有几种,下面分别介绍:
2.1.1. 节点取余分区
使用特定的数据,如 Redis 的 键 或 用户 ID,再根据 节点数量 N 使用公式:hash(key)% N 计算出 哈希值,用来决定数据 映射 到哪一个节点上。

优点
这种方式的突出优点是 简单性,常用于 数据库 的 分库分表规则。一般采用预分区的方式,提前根据 数据量 规划好 分区数,比如划分为 512 或 1024 张表,保证可支撑未来一段时间的 数据容量,再根据 负载情况 将 表 迁移到其他 数据库 中。扩容时通常采用 翻倍扩容,避免 数据映射 全部被 打乱,导致 全量迁移 的情况。
缺点
当 节点数量 变化时,如 扩容 或 收缩 节点,数据节点 映射关系 需要重新计算,会导致数据的 重新迁移。
2.1.2. 一致性哈希分区
一致性哈希 可以很好的解决 稳定性问题,可以将所有的 存储节点 排列在 收尾相接的 Hash 环上,每个 key 在计算 Hash 后会 顺时针 找到 临接 的 存储节点 存放。而当有节点 加入 或 退出 时,仅影响该节点在 Hash 环上 顺时针相邻 的 后续节点。
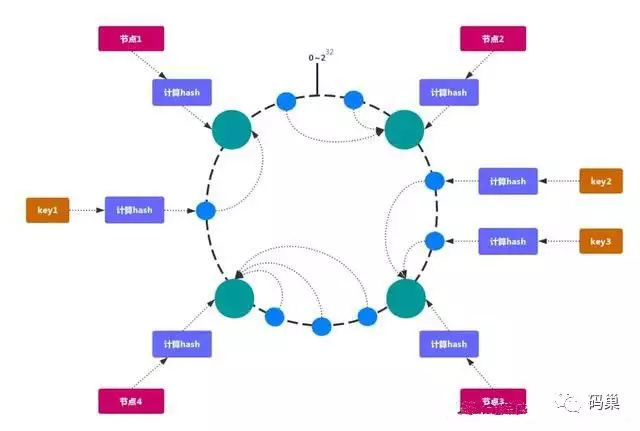
优点
加入 和 删除 节点只影响 哈希环 中 顺时针方向 的 相邻的节点,对其他节点无影响。
缺点
加减节点 会造成 哈希环 中部分数据 无法命中。当使用少量节点 时,节点变化 将大范围影响 哈希环 中 数据映射,不适合 少量数据节点 的分布式方案。普通的 一致性哈希分区 在增减节点时需要 增加一倍 或 减去一半 节点才能保证 数据 和 负载的均衡。
注意:因为一致性哈希分区 的这些缺点,一些分布式系统采用 虚拟槽 对 一致性哈希 进行改进,比如 Dynamo 系统。
2.1.3. 虚拟槽分区
虚拟槽分区 巧妙地使用了 哈希空间,使用 分散度良好 的 哈希函数 把所有数据 映射 到一个 固定范围 的 整数集合 中,整数定义为 槽(slot)。这个范围一般 远远大于 节点数,比如 Redis Cluster 槽范围是 0 ~ 16383。槽 是集群内 数据管理 和 迁移 的 基本单位。采用 大范围槽 的主要目的是为了方便 数据拆分 和 集群扩展。每个节点会负责 一定数量的槽,如图所示:
当前集群有 5 个节点,每个节点平均大约负责 3276 个 槽。由于采用 高质量 的 哈希算法,每个槽所映射的数据通常比较 均匀,将数据平均划分到 5 个节点进行 数据分区。Redis Cluster 就是采用 虚拟槽分区。
· 节点 1:包含 0 到 3276 号哈希槽。
· 节点 2:包含 3277 到 6553 号哈希槽。
· 节点 3:包含 6554 到 9830 号哈希槽。
· 节点 4:包含 9831 到 13107 号哈希槽。
· 节点 5:包含 13108 到 16383 号哈希槽。
这种结构很容易 添加 或者 删除 节点。如果增加 一个节点 6,就需要从节点 1 ~ 5 获得部分 槽 分配到节点 6 上。如果想 移除 节点 1,需要将节点 1 中的 槽 移到节点 2 ~ 5 上,然后将 没有任何槽 的节点 1 从集群中 移除 即可。
由于从一个节点将 哈希槽 移动到另一个节点并不会 停止服务,所以无论 添加删除 或者 改变 某个节点的 哈希槽的数量 都不会造成 集群不可用 的状态.
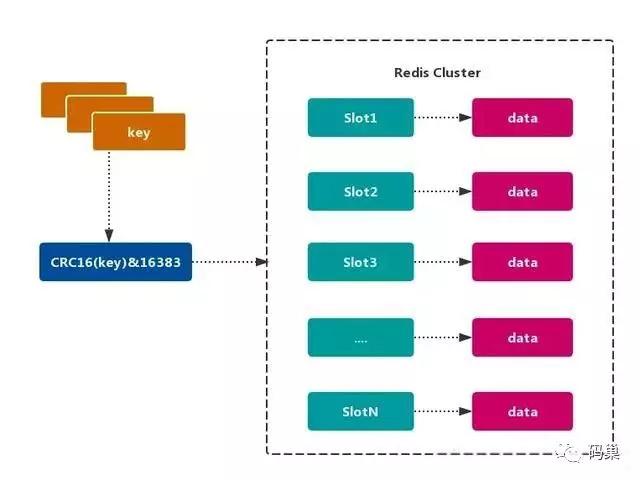
2.2. Redis的数据分区
Redis Cluster 采用 虚拟槽分区,所有的 键 根据 哈希函数 映射到 0~16383 整数槽内,计算公式:slot = CRC16(key)& 16383。每个节点负责维护一部分槽以及槽所映射的 键值数据,如图所示:
2.2.1. Redis虚拟槽分区的特点
· 解耦 数据 和 节点 之间的关系,简化了节点 扩容 和 收缩 难度。
· 节点自身 维护槽的 映射关系,不需要 客户端 或者 代理服务 维护 槽分区元数据。
· 支持 节点、槽、键 之间的 映射查询,用于 数据路由、在线伸缩 等场景。
2.3. Redis集群的功能限制
Redis 集群相对 单机 在功能上存在一些限制,需要 开发人员 提前了解,在使用时做好规避。
· key 批量操作 支持有限。
类似 mset、mget 操作,目前只支持对具有相同 slot 值的 key 执行 批量操作。对于 映射为不同 slot 值的 key 由于执行 mget、mget 等操作可能存在于多个节点上,因此不被支持。
· key 事务操作 支持有限。
只支持 多 key 在 同一节点上 的 事务操作,当多个 key 分布在 不同 的节点上时 无法 使用事务功能。
· key 作为 数据分区 的最小粒度
不能将一个 大的键值 对象如 hash、list 等映射到 不同的节点。
不支持 多数据库空间
单机 下的 Redis 可以支持 16 个数据库(db0 ~ db15),集群模式 下只能使用 一个 数据库空间,即 db0。
· 复制结构 只支持一层
从节点 只能复制 主节点,不支持 嵌套树状复制 结构。
如果觉得我的文章对您有用,请点赞。您的支持将鼓励我继续创作!
赞11作者其他文章
评论 5 · 赞 13
评论 0 · 赞 1
评论 0 · 赞 2
评论 0 · 赞 1
评论 0 · 赞 0
添加新评论0 条评论