混合云编排工具Terraform简介
1 Terraform背景
1.1 混合云编排
目前各大公有云以及云管理平台均提供了非常友好的交互界面,用户可以像超市买东西一样自助采购云资源。然而,当用户需要批量快速打包采购大量不同类型的云资源时,云管页面过多的交互反而降低了资源采购效率。
据统计,一个熟悉AWS页面操作的工程师,在AWS上初始化一个VPC包括创建VPC、子网、internet网关、NAT网关、路由等工作至少需要花费20分钟的时间,如果涉及跨多个云平台,则花费的时间势必会更长。这就像我们逛超市,不同的商品在不同的区域,甚至不同的售卖方式,有些东西还可能需要逛多个超市去买,很多重复的体力活,一件一件地买不仅工作量繁重还非常浪费时间。
如果我们只需要写一份完整货单然后直接下单效率就会提高很多,而且货单可以随时修改和复用。在云计算中这被称作资源编排(Orchestration),其实在很多云平台中都已经提供了资源编排的功能,比如AWS的CloudFormation、OpenStack的Heat等。
但是如上工具通常仅限用于自家的单一云平台上,而在混合云场景下,往往需要跨多个云平台,不仅有IaaS资源,还有PaaS资源,如果杂糅非常多的云编排工具,则不仅导致学习成本高、代码复用率低,还导致管理混乱,不利于多云的协同工作。解决如上问题的方法是引入一个统一的编排工具,能够通过相同的语法同时编排AWS、GCP、Kubernetes、Vmware、OpenStack、阿里云等云资源。
而这个混合云统一编排工具目前已经有很好的开源项目支持了,它就是下面将要介绍的Terraform项目。
1.2 Terraform简介
Terraform的设计目标为Infrastructure as Code,这里的Infrastructure是一个非常抽象的东西,可以认为是数据中心的一切抽象,如二层网络、交换机(子网)、路由器、虚拟机、负载均衡、防火墙、数据库等等。
Terraform是由Hashicorp公司推出的一个开源项目,这是一家牛逼的公司,除了Terraform项目,开源的项目还有我们熟知的Consul、Vault、Nomad等,涵盖了应用的Provision(资源供给)、Secure(密钥安全)、Connect(分布式通信)、Run(运行)4个阶段。

Terraform和前面提到的CloudFormation、Heat相比除了支持混合云统一编排以外,还有个不同之处在于,Terraform在真正执行之前中间会有个plan计划阶段,这个阶段能够预览哪些资源会新创建、哪些资源会被删除以及更新,这有点像git在commit之前先执行diff人工review下代码,让开发者能够提前检查语法是否有错误以及资源是否为期望结果。
可能有人会说目前不是已经有一些配置管理工具(Configuration Management)如Puppet、Ansible、Chef等同样也可以创建云资源,比如Ansible就提供了模块支持创建AWS资源Ansible: Amazon Web Services,甚至可以通过 -- dry - run参数实现类似Terraform的plan功能。
但二者其实是有差别的,首先Orchestration如Terraform主要解决底层基础设施资源管理问题,而配置管理工具如Ansible主要面向操作系统的配置。其次Orchestration通常是声明式的(Declarative),声明式只关心最终的全局结果是否符合期望,如果和声明的不一致,则创建或者修改资源使其匹配最终状态。而配置管理工具通常是面向过程的(Procedural),需要告诉它哪个有,哪个没有,哪一步怎么做,执行时关心的是每个指令而不是最终的全局结果。
打个比方使用Ansible和Terraform都可以实现在AWS上同时创建5个虚拟机,并且都是通过 count = 5变量指定实例数量。
Ansible:
- ec2: count: 5
- image: ami-1
- instance_type: t2.micro
Terraform:
- resource "aws_instance" "example" {
- count = 5
- ami = "ami-1"
- instance_type = "t2.micro"
- }
现在如果需要增加1个虚拟机,Terraform只需要把 count值修改为6即可,因为 count表示为全局的最终结果。但Ansible如果把 count修改为6,则会再创建6个虚拟机,一共11个虚拟机,因此要实现创建6台虚拟机,只能再拷贝一份代码并指定 count为1,非常不灵活。
如果修改AMI镜像,Terraform只需要修改ami参数为新镜像ID即可,Ansible则必须重写模块,并且需要手动删除没用的旧虚拟机。
2 Terraform入门
Terrafrom的安装可参考官方的文档Installing Terraform,安装完后建议先配置子命令自动补全功能:
- terraform -install-autocomplete
2.1 Provider
Terraform其中一个最重要的概念为Provider,Provider为后端驱动,类似于Ansible的模块或者驱动,Provider为云平台的插件,换句话说,只需要实现Provider,就可以对接任一云平台。目前大多数云平台的Provider插件均已经实现了,AWS对应的Provider为 aws,阿里云对应的Provider为 alicloud。由于资源必然属于某个云平台,因此显然Terraform中所有的资源必须隶属于某个Provider。
Terraform目前支持超过160多种的providers,可以说只要人听过的云都能支持,主流的如AWS、GCP、OpenStack等,国内的阿里云、腾讯云、Ucloud以及OpenStack系的华为云、京东云等。
除了公有云,私有云如Oracle、Vmware的支持也都完全没有问题。同时也支持目前主流的PaaS平台,如Kubernetes、Helm、Rancher2等,基本不需要再造轮子直接用就完了。

Provider在Terraform中以插件的形式加载,在init阶段Terraform会自动下载所需要的所有Provider插件。
定义Provider实例的语法如下:
- provider "aws" {
- profile = "default"
- region = "cn-northwest-1"
- }
语法和Puppet、Ansible非常类似。
其中 aws为需要加载的Provider插件名称,大括号里面的内容为该Provider的配置, profile为 default表示AWS的认证信息为 ~ /.aws/ credentials的 default配置信息。当然也可以直接把AKSK(access key、secret key)直接硬编码放到provider,不过这存在AKSK泄露的隐患,不建议这么做。
如上运行 teraform init会自动下载Provider aws插件。
2.2 Resource
2.2.1 Resource声明与创建
Resource是Terraform的主角,开发者大多数工作都是和Resource打交道,云平台中所有的资源都可以抽象为Terraform中的一个Resource实例。
定义一个Resource的语法非常简单,以官方的demo为例:
cat example.tf
- / 省略了Provider的定义 /
- resource "aws_instance" "example" {
- ami = "ami-0829e595217a759b9"
- instance_type = "t2.micro"
- tags = {
- "Owner" = "int32bit"
- "Name" = "int32bit-test-ft"
- }
- }
- 其中 aws_instance为资源类型(Resource Type),定义这个资源的类型,告诉Terraform这个Resource是AWS的虚拟机还是阿里云的VPC。
- example为资源名称(Resource Name),资源名称在同一个模块中必须唯一,主要用于供其他资源引用该资源。
- 大括号里面的block块为配置参数(Configuration Arguments),定义资源的属性,比如虚拟机的规格、镜像、标签等。
显然这个Terraform脚本的功能为在AWS上创建一个EC2实例,镜像ID为 ami - 0829e595217a759b9,规格为 t2 . micro,自定义了 Owner和 Name两个标签。
运行 terraform init将根据脚本内容自动下载Provider插件:

我们可以随时通过 terraform plan预览查看这个脚本将要执行的任务:
terraform plan
- An execution plan has been generated and is shown below.
- Resource actions are indicated with the following symbols:
- create
- Terraform will perform the following actions:
aws_instance.example will be created
- resource "aws_instance" "example" {
- ami = "ami-0829e595217a759b9"
- arn = (known after apply)
- tags = {
- "Name" = "int32bit-test-ft"
- "Owner" = "int32bit"
- }
- vpc_security_group_ids = (known after apply)
- ...
- Plan: 1 to add, 0 to change, 0 to destroy.
如上输出可知,Terraform脚本将创建一个资源 aws_instance . example,其中某些属性如ARN为 known after apply,说明需要apply之后才能知道。
最后执行 terrafrom apply执行:
terraform apply
- Plan: 1 to add, 0 to change, 0 to destroy.
- Do you want to perform these actions?
- Terraform will perform the actions described above.
- Only 'yes' will be accepted to approve.
- Enter a value: yes
- aws_instance.example: Creating...
- aws_instance.example: Still creating... [10s elapsed]
- aws_instance.example: Still creating... [20s elapsed]
- aws_instance.example: Creation complete after 20s [id=i-0bb96d24b6e6d37eb]
Apply complete! Resources: 1 added, 0 changed, 0 destroyed.
apply会自动调用 plan预览将要改变的资源,输入 yes确认无误后真正执行,由输出可知创建的EC2 ID为 i - 0bb96d24b6e6d37eb。
AWS查看虚拟机信息如下:

2.2.2 Resource state文件
通过 terraform show可查看创建的资源列表。
terraform show
aws_instance.example:
- resource "aws_instance" "example" {
- ami = "ami-0829e595217a759b9"
- arn = "arn:aws-cn:ec2:cn-northwest-1:769527305874:instance/i-0bb96d24b6e6d37eb"
- availability_zone = "cn-northwest-1b"
- id = "i-0bb96d24b6e6d37eb"
- instance_state = "running"
- instance_type = "t2.micro"
- private_ip = "172.31.29.5"
- tags = {
- "Name" = "int32bit-test-ft"
- "Owner" = "int32bit"
- }
- root_block_device {
- delete_on_termination = true
- encrypted = false
- iops = 100
- volume_id = "vol-033ff2804c08b927a"
- volume_size = 8
- volume_type = "gp2"
- }
- }
注意 terrafrom show读取的是Terraform自己的数据库而不是调用云平台API,所有Terraform的资源都会保存到自己的数据库上,默认会放在本地目录,文件名为 terraform . tfstate,这个 state文件非常重要,如果该文件损坏将导致已创建的资源被破坏或者重建,因此可以认为Terraform是一个有状态服务,涉及多人协作时不仅需要拷贝代码,还需要拷贝 state文件,这会导致维护起来特别麻烦,可幸的是Terraform支持把 state文件放到S3上或者consul,参考官方文档Remote State,建议把state文件从代码中分离放到S3上。
2.2.3 Resource更新
由Terraform的Infrastructure as Code的设计目标,资源是可以随时修改的,如下EC2增加一个标签 Newkey:
- resource "aws_instance" "example" {
- ami = "ami-0829e595217a759b9"
- instance_type = "t2.micro"
- tags = {
- "Owner" = "int32bit"
- "Name" = "int32bit-test-ft"
- "Newkey" = "test_new_key"
- }
- }
这里省略plan步骤直接apply:
terraform apply
- aws_instance.example: Refreshing state... [id=i-0bb96d24b6e6d37eb]
- An execution plan has been generated and is shown below.
- Resource actions are indicated with the following symbols:
- ~ update in-place
- Terraform will perform the following actions:
aws_instance.example will be updated in-place
- ~ resource "aws_instance" "example" {
- / ... /
- ~ tags = {
- "Name" = "int32bit-test-ft"
- "Newkey" = "test_new_key"
- "Owner" = "int32bit"
- }
- }
- Plan: 0 to add, 1 to change, 0 to destroy.
- aws_instance.example: Modifying... [id=i-0bb96d24b6e6d37eb]
- aws_instance.example: Modifications complete after 1s [id=i-0bb96d24b6e6d37eb]
- Apply complete! Resources: 0 added, 1 changed, 0 destroyed.
如上 update in - place表示不需要重建资源直接修改资源属性,由于本次修改只是添加一个标签,不需要重新创建虚拟机,因此可以通过 update in - place实现
资源预览中 +表示添加的内容, ~表示更新的内容, -表示即将删除的内容。
如果修改 AMI如下:
- resource "aws_instance" "example" {
- ami = "ami-08af324f69cf03287"
- instance_type = "t2.micro"
- tags = {
- "Owner" = "int32bit"
- "Name" = "int32bit-test-ft"
- "Newkey" = "test_new_key"
- }
- }
执行 apply结果如下:
terraform apply
- aws_instance.example: Refreshing state... [id=i-0bb96d24b6e6d37eb]
- Resource actions are indicated with the following symbols:
- -/+ destroy and then create replacement
- Terraform will perform the following actions:
aws_instance.example must be replaced
- -/+ resource "aws_instance" "example" {
- ~ ami = "ami-0829e595217a759b9" -> "ami-08af324f69cf03287"
- ~ id = "i-0bb96d24b6e6d37eb" -> (known after apply)
- ~ instance_state = "running" -> (known after apply)
- ~ private_ip = "172.31.29.5" -> (known after apply)
- tags = {
- "Name" = "int32bit-test-ft"
- "Newkey" = "test_new_key"
- "Owner" = "int32bit"
- }
- ~ root_block_device {
- ~ delete_on_termination = true -> (known after apply)
- ~ encrypted = false -> (known after apply)
- ~ iops = 100 -> (known after apply)
- kms_key_id = (known after apply)
- ~ volume_id = "vol-033ff2804c08b927a" -> (known after apply)
- ~ volume_size = 8 -> (known after apply)
- ~ volume_type = "gp2" -> (known after apply)
- }
- }
- Plan: 1 to add, 0 to change, 1 to destroy.
- aws_instance.example: Destroying... [id=i-0bb96d24b6e6d37eb]
- aws_instance.example: Destruction complete after 30s
- aws_instance.example: Creating...
- aws_instance.example: Creation complete after 41s [id=i-0f87444adc1c2b7b4]
- Apply complete! Resources: 1 added, 0 changed, 1 destroyed.
此时由于AWS EC2实例不支持直接修改AMI,因此Terraform为了与我们的声明最终期望一致,先把之前的资源删除,然后创建一个新的EC2实例。
从AWS console上也可以看到原来的虚拟机 terminate了,重新创建了一个新的虚拟机:
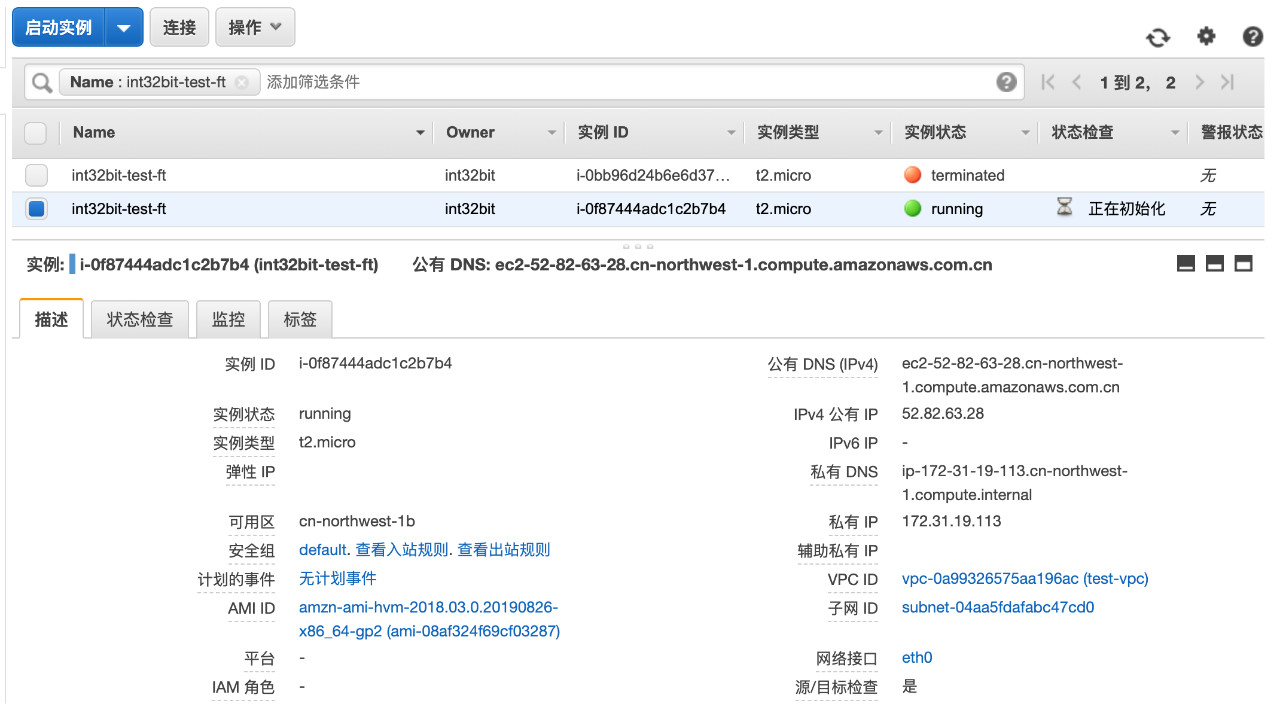
删除的资源不可回退,因此建议在 apply之前在plan中仔细查看哪些资源是原地修改的,哪些需要重建,哪些资源会被删除,避免资源被意外删除。
2.2.4 Resource之间的依赖
和Ansible、Puppet一样资源之间可能会有依赖,Terraform支持隐式依赖和显式依赖,隐式依赖由Terraform自动根据资源的引用关系分析资源的依赖关系,比如A引用了B,则A依赖于B,A资源创建之前必须先创建B。
如下我们为EC2实例绑定个弹性IP:
- resource "aws_instance" "example" {
- ami = "ami-08af324f69cf03287"
- instance_type = "t2.micro"
- tags = {
- "Owner" = "int32bit"
- "Name" = "int32bit-test-ft"
- "Newkey" = "test_new_key"
- }
- }
- resource "aws_eip" "example_public_ip" {
- vpc = true
- instance = aws_instance.example.id
- }
此时由于 example_public_ip引用了 example的 id,因此 example_public_ip依赖于EC2实例 example,Terraform会先创建EC2实例,然后绑定弹性IP。
隐式依赖基本能解决90%的问题,大多数情况下我们不需要显式告诉Terraform哪些资源存在依赖。当然仍可能存在需要显式依赖的情况,Terraform通过 depends_on指明资源所依赖的资源列表,比如EC2实例需要通过role访问S3,此时需要在虚拟机中关联角色,角色中的policy必须先就绪,这种情况下资源之间没有引用关系,Terraform无法推导资源的依赖关系,因此必须通过 depends_on显示声明所依赖的资源。
- depends_on = [
- aws_iam_role_policy.example,
- ]
通过Terraform的 graph可以导出资源的依赖图:
- terraform graph | dot -Tsvg > graph.svg
3 Terraform其他功能
3.1 Input Variables
如上实例把AMI和instance type硬编码到脚本中非常不灵活,Terraform支持输入变量功能,建议把变量单独抽取出来,变量通过 variable关键字声明:
- variable "image_id" {
- type = string
- default = "ami-08af324f69cf03287"
- description = "The id of the machine image (AMI) to use for the server."
- }
- variable "instance_type" {
- default = "t2.micro"
- }
变量包括变量名称以及数据类型,数据类型默认为 string,另外可以提供default默认值以及description。
此时可以在同一模块中的任意Resource通过 var .变量名引用变量:
- resource "aws_instance" "example" {
- ami = var.image_id
- instance_type = var.instance_type
- tags = {
- "Owner" = "int32bit"
- "Name" = "int32bit-test-ft"
- "Newkey" = "test_new_key"
- }
- }
此时 plan以及 apply均可以通过形如 - var a = b的形式指定变量值:
- terraform apply \
- -var instance_type=t2.small \
- -var image_id=ami-0fcb508ec48b146df
也可以通过后缀名为 . tfvars的文件指定变量值:
cat example.tfvars
- image_id = "ami-0fcb508ec48b146df"
- instance_type = "t2.small"
terraform apply -var-file=example.tfvars
如果tfvars文件名为 terraform . tfvars或者 *. auto . tfvars,则Terraform会自动加载不需要通过 - var - file指定。
另外还可以通过环境变量的形式指定变量值,环境变量名为 TF_VAR_name,如 TF_VAR_image_id。
如果变量没有指定并且没有默认值,则在apply时会通过交互方式请求用户手动输入变量值。
3.2 Output Values
Output values用于Terraform执行完后输出结果,在多模块中子模块的output还可以被父模块引用。
如下输出EC2实例的ID以及私网IP:
- output "instance_id" {
- value = aws_instance.example.id
- }
- output "private_ip" {
- value = aws_instance.example.private_ip
- }
再次执行 apply:
terraform apply
- aws_instance.example: Refreshing state... [id=i-0f87444adc1c2b7b4]
- aws_eip.ip: Refreshing state... [id=eipalloc-0e2cec51cbf18b5d3]
- Apply complete! Resources: 0 added, 0 changed, 0 destroyed.
- Outputs:
- instance_id = i-0f87444adc1c2b7b4
- private_ip = 172.31.19.113
也可以通过 terraform output命令输出output值:
terraform output
- instance_ip = i-0f87444adc1c2b7b4
- private_ip = 172.31.19.113
3.3 Modules
如果把所有的资源都杂糅放到一块,则必然导致脚本很难维护,因此有必要按照不同的功能将代码分开,Terraform支持Module功能,通过 source加载子模块。
如下是目录的结构:
tree
- .
- ├── example.tfvars
- ├── main.tf
- ├── sub_module
- │ ├── main.tf
- │ └── variables.tf
- ├── terraform.tfstate
- └── terraform.tfstate.backup
- 1 directory, 6 files
在当前工作目录中有一个子目录sub_module,这个子目录也是一个基本完整的Terraform项目。然后通过 module关键字加载模块:
cat main.tf
- provider "aws" {
- profile = "default"
- region = "cn-northwest-1"
- }
- module "example" {
- source = "./sub_module"
- image_id = "ami-08af324f69cf03287"
- instance_type = "t2.micro"
- }
- output "private_ip" {
- value = module.example.private_ip
- }
- output "instance_id" {
- value = module.example.instance_id
- }
module中必须通过 source参数指定子模块路径,如果子模块中有Input Variables,可以在module的body中指定。
另外由上面的例子可知,在父模块中可以引用子模块的output值。
3.4 Data Sources
前面我们使用的参数都是固定的静态变量,但有些情况下可能参数变量不确定或者参数可能随时变化。比如我们创建虚拟机通常需要指定我们自己的镜像模块,但我们的模板可能随时更新,如果在代码中指定AMI ID,则一旦我们更新镜像模板就需要重新修改代码。
Terraform中的Data Sources可以认为是动态变量,只有在运行时才能知道变量的值。
Data Sources通过 data关键字声明,如下:
- data "aws_ami" "my_image" {
- most_recent = true
- owners = ["self"]
- tags = {
- Name = "test-template-ami"
- Tested = "True"
- }
- filter {
- name = "state"
- values = ["available"]
- }
- }
- resource "aws_instance" "example" {
- ami = data.aws_ami.my_image.id
- instance_type = var.instance_type
- tags = {
- "Owner" = "int32bit"
- "Name" = "int32bit-test-ft"
- "Newkey" = "test_new_key"
- }
- }
如上例子中的EC2镜像没有指定AMI ID,而是通过 data引用,Terraform运行时将首先根据标签选择镜像,然后选择状态为 available的镜像,如果同时有多个镜像满足条件,则选择最新的镜像。
4 总结
Terraform是非常强大的混合云编排工具,语法简单明了,只需要通过配置文件声明需要的资源列表,Terraform就能够快速地完成多云资源的创建。
当然Terraform也有个问题就是前面提到的它是一个有状态服务,意味着被Terraform管理的资源,不能通过手动或者借助其他工具管理资源,因为外部修改资源后,Terraform会认为和期望结果不一致而触发一次更新操作。
如果觉得我的文章对您有用,请点赞。您的支持将鼓励我继续创作!
赞2作者其他文章
评论 0 · 赞 2
评论 0 · 赞 1
评论 1 · 赞 3
评论 0 · 赞 1
评论 1 · 赞 5
添加新评论0 条评论