CentOS 7环境下Zabbix4.0的安装和配置实例
1. 安装准备
Zabbix4.0对基础架构有一定的要求,尤其是对PHP和MySQL:
| 类型 | 内容 |
|---|---|
| 服务端运行环境 | Linux & PHP & Web Server & Database |
| 服务端操作系统 | CentOS7.5-1804 |
| PHP | PHP 5.4.0(官方要求5.4.0+) |
| Web Server | Apache2.4.6(官方要求1.3.12+) |
| 数据库 | Percona Server 57-5.7.22(官方要求5.0.3 - 8.0.x) |
| 安装方式 | YUM-RPM |
| 客户端操作系统 | AIX/Linux/Windows |
2. 安装环境
Zabbix Server运行在CentOS上,Zabbix Agent可以运行主流的操作系统上,本文档的安装环境为:
| 类型 | 描述 | 地址 |
|---|---|---|
| Zabbix Server | CentOS7 | 10.1.3.21 |
| Zabbix Linux Agent | CentOS 7.5 | |
| Zabbix AIX Agent | AIX 6.1 | |
| Zabbix Windows Agent | Windows Server 2016 |
3. 安装配置Zabbix Server
3.1. 安装Zabbix Server
首先,获取Zabbix官方的YUM源:
值得注意的是,官方的Yum源文件版本可能随时更新,本文列出的地址如果无法下载,可以到官方的主站寻求最新的版本:http://repo.zabbix.com/zabbix/# Zabbix 4.0
shell> rpm -ivh http://repo.zabbix.com/zabbix/3.5/rhel/7/x86_64/zabbix-release-3.5-1.el7.noarch.rpm
# Zabbix 3.4
shell> rpm -ivh http://repo.zabbix.com/zabbix/3.4/rhel/7/x86_64/zabbix-release-3.4-2.el7.noarch.rpm
# Zabbix 3.0
shell> rpm -ivh http://repo.zabbix.com/zabbix/3.0/rhel/7/x86_64/zabbix-release-3.0-1.el7.noarch.rpm其次,获取epel官方的YUM源:
值得注意的是,官方的Yum源文件版本可能随时更新,本文列出的地址如果无法下载,可以到官方的主站寻求最新的版本:http://ftp.cuhk.edu.hk/pub/linux/fedora-epel/7/x86_64/Packages/e/shell> rpm -ivh http://ftp.cuhk.edu.hk/pub/linux/fedora-epel/7/x86_64/Packages/e/epel-release-7-11.noarch.rpm然后,安装依赖包:
shell> yum install httpd php php-mysql php-gd php-bcmath php-common php-xml php-mbstring php-cliZabbix 需要的 PHP 扩展库:
php-mysql:使用MySQL作为Zabbix后端数据库所需要的组件;php-gd:PHP GD扩展库必须支持 PNG 图像(--with-png-dir)、JPEG 图像(--with-jpeg-dir)和FreeType2(--with-freetype-dir);php-bcmath:包含所需的bcmath;php-common:包含所需的ctype和php-session扩展;php-xml:包含所需的libXML、xmlreader和xmlwriter扩展。php-mbstring:包含所需的mbstring扩展。
shell> yum install pcre glibc gcc livevent zlib libcurl-devel curl-devel OpenIPMI-devel libssh2 fping net-snmp-devel perl-DBI openssl-devel iksemel libxml2 ntp Zabbix 需要的依赖包:
pcre:为强制安装的包。用来支持Perl Compatible Regular Expression(PCRE);gcc:为强制安装的包。即编译器,glibc:为强制安装的包。即libc运行库,其中包含了所需的Libpthreadlibevent:为强制安装的包,用来支持 IPMI;zlib:为强制安装的包。用来支持压缩;libcurl-devel、curl-devel:为可选安装包,但建议安装。用来支持 Web 监控;OpenIPMI-devel:为可选安装包,按需安装。用来支持IPMI监控;libssh2:为可选安装包。用来支持SSH功能;fping: 为可选安装包,但建议安装。用来支持ICMP Ping监控;net-snmp-devel:为可选安装包,按需安装。用来支持SNMP监控;iksemel:为可选安装包,按需安装。用来支持 Zabbix 报警媒介 Jabber;libxml2:为可选安装包,按需安装。用来支持 VMware 监控;ntp:为可选安装包,但强烈建议安装。用来保持 Zabbix 精准的时间。
最后,安装Zabbix-Server。
shell> yum install zabbix-agent zabbix-server-mysql zabbix-web-mysql zabbix-get zabbix-webZabbix 服务端上的安装包:
zabbix-agent:为可选安装包,但在 Zabbix Server 上建议安装。Zabbix 客户端代理程序;zabbix-server-mysql、zabbix-web-mysql:为强制安装的包。前者用来存放采集到的数据,后来为前端所需;zabbix-get:为可选安装包,但在 Zabbix Server 上建议安装。Zabbix 用来手动采集数据的命令;zabbix-web:为可选安装包,但在 Zabbix Server 上建议安装。Zabbix用来监控 Web 服务的。zabbix-java-gateway:为可选安装包,按需安装。Zabbix 的 JAVA 采集服务端,用于 JMX 的监控方式。
Zabbix 客户端上的安装包:
zabbix-agent:为强制安装包。Zabbix 客户端代理程序;zabbix-sender:为可选安装包,但强烈建议安装。Zabbix agent 向 Zabbix server 手动发送数据的命令;zabbix-proxy-mysql:为可选安装包,按需安装。Zabbix proxy 是 Zabbix 代理服务的程序,适用于分布式监控环境。
3.2. 安装数据库(PerconaDB 5.7)
首先,获取PerconaDB官方的YUM源:
值得注意的是,官方的Yum源文件版本可能随时更新,本文列出的地址如果无法下载,可以到官方的主站寻求最新的版本:https://www.percona.com/downloads/percona-release/redhat/shell> yum install https://www.percona.com/redir/downloads/percona-release/redhat/0.1-6/percona-release-0.1-6.noarch.rpm其次,通过YUM方式安装PerconaDB 57。
shell> yum remove mariadb*                     #移除自带的 Mariadb
shell> yum install Percona-Server-server-57再次,修改PerconaDB的配置文件。
shell> cat /etc/my.cnf
[client]
port = 3306
socket = /var/lib/mysql/mysql.sock

[mysql]
prompt="\\u@mysqldb \\R:\\m:\\s [\\d]> "
no-auto-rehash

[mysqld]
user= mysql
port = 3306
datadir = /data/mysql/
socket = /var/lib/mysql/mysql.sock
pid-file = mysqldb.pid
character-set-server = utf8mb4
skip_name_resolve = 1

# Timestamp
explicit_defaults_for_timestamp = 1

# Connections
back_log = 1024
max_connections = 512
max_connect_errors = 5120
innodb_thread_concurrency = 16

# Limit
open_files_limit = 65535
innodb_open_files = 65535

# Query Cache
query_cache_type = 0
query_cache_size = 0

# binary logs
server-id = 3306001
binlog_format = row
log-bin = /data/mysql/mysql-binlog
expire_logs_days = 7
sync_binlog = 1
max_binlog_size = 1G
binlog_cache_size = 4m
max_binlog_cache_size = 1G

# slow query
slow_query_log = 1
long_query_time = 2
slow_query_log_file = /data/mysql/slow.log

# Timeout
interactive_timeout = 600
wait_timeout = 600

# Engine
default-storage-engine = innodb

# Buffer
key_buffer_size = 32M
read_buffer_size = 1M
sort_buffer_size = 1M
read_rnd_buffer_size = 1M
tmp_table_size = 32M

join_buffer_size = 16M
max_heap_table_size = 32M
max_tmp_tables = 48
thread_cache_size = 32


# Time
log_timestamps = SYSTEM

# Tablespace & File I/O
innodb_data_file_path = ibdata1:1G:autoextend
innodb_file_per_table = 1

# Redo Log
innodb_flush_log_at_trx_commit = 1
innodb_log_file_size = 256M
innodb_log_files_in_group = 2
innodb_log_buffer_size = 16M

# Innodb
innodb_buffer_pool_size = 1G
innodb_flush_method = O_DIRECT
innodb_change_buffer_max_size = 50
innodb_max_dirty_pages_pct = 30
innodb_buffer_pool_load_at_startup = 1
innodb_buffer_pool_dump_at_shutdown = 1
innodb_io_capacity = 500
innodb_io_capacity_max= 1000
innodb_support_xa = 0
innodb_rollback_on_timeout = 1
值得注意的是:
- 如果修改
socket的文件位置,那么 Zabbix 配置文件中DBSocket=参数也需要修改,单方面修改的话 Zabbix 会提示连接不到数据库;- 原则上 innodb_buffer_pool_size 需要设置为主机内存的 80% ;
然后,初始化数据库:
shell> cat /var/log/mysqld.log  | grep "A temporary password" | awk -F " " '{print$11}'
shell> cat /var/log/mysqld.log
2017-04-28T08:07:09.138876Z 1 [Note] A temporary password is generated for root@localhost: y:Pw/=XIS5oq
shell> mysqld --initialize --datadir=/data/mysql/
shell> systemctl start mysqld
shell> systemctl enable mysqld
shell> mysqladmin -uroot -p password
Enter password:                                 # 输入mysqld.log的临时密码
New password:                                   # 输入新的密码
Confirm new password:                           # 再次输入以确认
Warning: Since password will be sent to server in plain text, use ssl connection to ensure password safety.
shell> mysql -u root -p最后,在Percona里面创建Zabbix数据库,并修改权限。
shell> mysql -uroot -p
root@mysqldb 17:16:  [(none)]> create database zabbix character set utf8;
# 创建数据库 Zabbix,并且使用 utf8 数据库编码;
Query OK, 1 row affected (0.02 sec)
root@mysqldb 17:16:  [(none)]> grant all privileges on zabbix.* to zabbix@127.0.0.1 identified by 'zabb1x@Mysql';
# 赋予权限,允许账户能从本机连接至数据库 zabbix,地址写的为 127.0.0.1,那么后面的相关配置配置就都要写 localhost,否则连接数据库就会有问题;
Query OK, 0 rows affected, 2 warnings (0.01 sec)
root@mysqldb 17:16:  [(none)]> flush privileges;
# 刷新系统权限
Query OK, 0 rows affected (0.02 sec)
root@mysqldb 17:16:  [(none)]> show databases
# 查看创建的数据库
-> ;
+--------------------+
| Database           |
+--------------------+
| information_schema |
| mysql              |
| performance_schema |
| sys                |
| zabbix             |
+--------------------+
5 rows in set (0.01 sec)
3.3. 配置NTP时间同步
Zabbix Server对时间的精确要求比较高,时间对数据的计算等都有影响。因此,可以自建NTP服务器,或同步网络时间。如下,使用Crontab同步网络时间。
shell> ntpdate -u asia.pool.ntp.org > /dev/null 2>&1
shell> systemctl enable ntpd
Created symlink from /etc/systemd/system/multi-user.target.wants/ntpd.service to /usr/lib/systemd/system/ntpd.service.
shell> systemctl restart ntpd
shell> echo '*/30 * * * * /usr/sbin/ntpdate -u asia.pool.ntp.org >/dev/null 2>&1'>>/var/spool/cron/root
3.4. 导入数据库
首先,获取Zabbix的数据库。
shell> cd /usr/share/doc/zabbix-server-mysql-4.0.0
shell> ls
AUTHORS ChangeLog COPYING create.sql.gz NEWS README最后,使用Percona来Zabbix的初始数据库schema和数据。
shell> cd /usr/share/doc/zabbix-server-mysql-4.0.0
shell> zcat create.sql.gz | mysql -uzabbix -pzabbix zabbix
mysql: [Warning] Using a password on the command line interface can be insecure.
3.5. 禁用Selinux以及按需禁用或者配置防火墙
防火墙可以按需配置,可以暂时关闭,后面再进行配置,但 Selinux必须关闭,否则后面启动Zabbix server的时候会报错。
shell> systemctl disable firewalld
Removed symlink /etc/systemd/system/dbus-org.fedoraproject.FirewallD1.service.
Removed symlink /etc/systemd/system/basic.target.wants/firewalld.service.
shell> systemctl stop firewalld
shell> sed -i 's/SELINUX=enforcing/SELINUX=disabled/' /etc/selinux/config
3.6. 修改Zabbix Server的配置文件
在zabbix_server.conf中有很多参数需要修改,此时先将Zabbix连接Percona的信息配置好,包括先前创建的数据库、其用户名和密码。需要注意的是,这里的参数必须和之前创建数据库的信息一致,否则后面运行Zabbix server时会有无法连接到数据库的报错。
shell> pwd
/etc/zabbix/
shell> vi zabbix_server.conf
LogFile=/var/log/zabbix/zabbix_server.log
LogFileSize=0
DebugLevel=3
PidFile=/var/run/zabbix/zabbix_server.pid
DBHost=localhost
DBName=zabbix                  #91行, 修改为数据库名(zabbix)
DBUser=zabbix                  #107行, 修改为数据库用户名(zabbix)
DBPassword=zabbix              #115行, 修改为数据库密码(zabbix)
3.7. 配置PHP
首先,Zabbix需要修改PHP的时区。
shell> sed -i "s@# php_value date.timezone Europe/Riga@php_value date.timezone Asia/Shanghai@g" /etc/httpd/conf.d/zabbix.conf最后,适当修改一些PHP配置文件的参数。
shell> cat /etc/httpd/conf.d/zabbix.conf
max_execution_time 600
memory_limit 256M
post_max-size 32M
upload_max_filesize 32M
max_input_time 600
3.8. 修改Web显示文字为微软雅黑
首先,将微软雅黑的字体msyh.ttf上传到/usr/share/zabbix/fonts/目录下:
shell> pwd
/usr/share/zabbix/fonts
shell> ll
total 21260
lrwxrwxrwx 1 root root       33 Aug 30 19:27 graphfont.ttf -> /etc/alternatives/zabbix-web-font
-rwxrwxrwx 1 root root 21767952 May  2  2017 msyh.ttf
最后,修改配置文件使用微软雅黑字体。
将代码区第 2 行和第 3 行的graphfont改为上传的中文字体,本例使用的字体为msyh(代码区内容所在为63行和108行, vi设置了set=number)。
shell> vi /usr/share/zabbix/include/defines.inc.php
63 define('ZBX_GRAPH_FONT_NAME',       'graphfont'); // font file name
108 define('ZBX_FONT_NAME', 'graphfont');
3.9. 配置Apache
首先,设置HTTPD开机自启。重启并访问Apache的默认页面。
shell> systemctl enable httpd
Created symlink from /etc/systemd/system/multi-user.target.wants/httpd.service to /usr/lib/systemd/system/httpd.service.
shell> systemctl restart httpd
shell> curl 192.168.88.101
<!DOCTYPE html PUBLIC "-//W3C//DTD XHTML 1.1//EN"
"http://www.w3.org/TR/xhtml11/DTD/xhtml11.dtd"><html><head>
<meta http-equiv="content-type" content="text/html; charset=UTF-8">
<title>Apache HTTP Server Test Page powered by CentOS</title>
<meta http-equiv="Content-Type" content="text/html; charset=UTF-8">然后,为了安全起见,可以删除Apache测试页面。
shell> pwd
/etc/httpd/conf.d
shell> ls
autoindex.conf  php.conf  README  userdir.conf  welcome.conf  zabbix.conf  zabbix.conf.rpmnew
# 将 welcome.conf 中的 8 到 11 用 # 注释。
shell> vim welcome.conf
  1 #
  2 # This configuration file enables the default "Welcome" page if there
  3 # is no default index page present for the root URL.  To disable the
  4 # Welcome page, comment out all the lines below.
  5 #
  6 # NOTE: if this file is removed, it will be restored on upgrades.
  7 #
  8 #<LocationMatch "^/+$">
  9 #    Options -Indexes
 10 #    ErrorDocument 403 /.noindex.html
11 #</LocationMatch>最后,同样地,为了安全起见,禁用Apache的目录列表配置。在Apache的配置文件中找到该行,将该行中的Indexes去掉,并重启进程。
shell> vim /etc/httpd/conf/httpd.conf
Options Indexes FollowSymLinks
shell> systemctl restart httpd
3.10. 启动Zabbix
启动zabbix-agent和zabbix-server,并将其添加到开机自启动。
shell> systemctl start zabbix-agent
shell> systemctl start zabbix-server
shell> systemctl enable zabbix-agent
shell> systemctl enable zabbix-server
4. 配置Zabbix Web管理页面
首先,浏览器键入http:IP/zabbix,点击Next step进行下一步;
其次,会出现检查PHP配置的页面。此前PHP已修改了相应参数,点击Next step进行下一步:
再次,会出现配置zabbix数据库的页面。其中Database host由localhost修改为127.0.0.1,Database port默认,Database name、User、Password为之前建立数据库的数据库名和用户名密码, 点击Next step进行下一步;
此页默认不需要修改,直接点击Next step进行下一步; 
然后,会出现配置信息汇总页面,待确认无误后点击Next step进行下一步;
点击Finish完成安装。
最后,完成配置,进入登录界面,输入默认的用户名Admin和密码zabbix,点击Sign in登录。
值得注意的是:如果此后需要修改,可以通过http://ip/zabbix/setup.php地址进行重新配置。
5. 升级Zabbix
5.1. 主要版本间的升级
首先,主要版本间的升级,需要先阅读官方的升级说明,再进行升级。
其次,备份Zabbix数据库。
再次,备份Zabbix Server的配置文件、PHP文件和Zabbix二进制文件。
# 配置文件
shell> mkdir /opt/zabbix-backup/
shell> cp /etc/zabbix/zabbix_server.conf /opt/zabbix-backup/
shell> cp /etc/httpd/conf.d/zabbix.conf  /opt/zabbix-backup/
# PHP 文件和 Zabbix 二进制文件
shell> cp -R /usr/share/zabbix/ /opt/zabbix-backup/
shell> cp -R /usr/share/doc/zabbix-* /opt/zabbix-backup/然后,更新新版的Zabbix官方YUM,并通过YUM UPGRADE进行升级。
shell> rpm -Uvh http://repo.zabbix.com/zabbix/4.0/rhel/7/x86_64/zabbix-release-4.0-1.el7.centos.noarch.rpm
shell> yum upgrade zabbix-server-mysql zabbix-web-mysql zabbix-agent
最后,待更新完成后, 重新修改中文字体(每次更新后必须修改)。
将代码区行的graphfont改为上传的中文字体。
shell> vi /usr/share/zabbix/include/defines.inc.php
define('ZBX_GRAPH_FONT_NAME',           'graphfont'); // font file name
define('ZBX_FONT_NAME', 'graphfont');
5.1.1. Zabbix 3.2升级至Zabbix 3.4
首先,停止Zabbix Server和Zabbix agent
shell> systemctl stop zabbix-server
shell> systemctl stop zabbix-agent 其次,备份数据库、Zabbix Server的配置文件、PHP文件和Zabbix二进制文件。
再次,卸载当前的Zabbix 3.2版本。
shell> rpm -qa zabbix*
shell> yum remove zabbix-agent zabbix-get zabbix-server-mysql zabbix-web-mysql
shell> yum remove zabbix-release
shell> yum clean all然后,安装Zabbix 3.4。
shell> wget http://repo.zabbix.com/zabbix/3.4/rhel/7/x86_64/zabbix-release-3.4-2.el7.noarch.rpm
shell> rpm -ivh zabbix-release-3.4-2.el7.noarch.rpm
shell> yum -y install zabbix-agent zabbix-get zabbix-server-mysql zabbix-web-mysql
恢复之前的Zabbix配置文件
shell> cd /etc/zabbix/
shell> mv zabbix_agentd.conf zabbix_agentd.conf.bak
shell> mv zabbix_agentd.conf.rpmsave zabbix_agentd.conf
shell> mv zabbix_server.conf zabbix_server.conf.bak
shell> mv zabbix_server.conf.rpmsave zabbix_server.conf
重新配置下Zabbix前端的配置文件
shell> vim /etc/httpd/conf.d/zabbix.conf
max_execution_time 600
memory_limit 256M
post_max-size 32M
upload_max_filesize 32M
max_input_time 600
php_value date.timezone Asia/Shanghai最后,启动Zabbix3.4,并检查数据库的升级日志。
shell> systemctl start httpd
shell> systemctl start zabbix-server
shell> systemctl start zabbix-agent
shell> cat /var/log/zabbix/zabbix-server.log
21485:20171117:153926.908 Starting Zabbix Server. Zabbix 3.4.4 (revision 74338).
21485:20171117:153926.908 ****** Enabled features ******
21485:20171117:153926.908 SNMP monitoring:           YES
21485:20171117:153926.908 IPMI monitoring:           YES
21485:20171117:153926.908 Web monitoring:            YES
21485:20171117:153926.908 VMware monitoring:         YES
21485:20171117:153926.908 SMTP authentication:       YES
21485:20171117:153926.908 Jabber notifications:      YES
21485:20171117:153926.908 Ez Texting notifications:  YES
21485:20171117:153926.908 ODBC:                      YES
21485:20171117:153926.908 SSH2 support:              YES
21485:20171117:153926.908 IPv6 support:              YES
21485:20171117:153926.908 TLS support:               YES
21485:20171117:153926.908 ******************************
21485:20171117:153926.908 using configuration file: /etc/zabbix/zabbix_server.conf
21485:20171117:153926.915 current database version (mandatory/optional): 03020000/03020001
21485:20171117:153926.915 required mandatory version: 03040000
21485:20171117:153926.915 optional patches were found
21485:20171117:153926.915 starting automatic database upgrade
21485:20171117:153926.920 completed 0% of database upgrade
21485:20171117:153926.929 completed 1% of database upgrade
...
...
21485:20171117:154003.058 completed 98% of database upgrade
21485:20171117:154003.089 completed 99% of database upgrade
21485:20171117:154003.984 completed 100% of database upgrade
21485:20171117:154003.984 database upgrade fully completed
21485:20171117:154004.469 server #0 started [main process]
21514:20171117:154004.470 server #1 started [configuration syncer #1]
...
...
21626:20171117:154011.249 server #81 started [preprocessing worker #3]
21624:20171117:154011.250 server #79 started [preprocessing worker #1]
21625:20171117:154011.258 server #80 started [preprocessing worker #2]
5.1.2. Zabbix 3.4升级至Zabbix 4.0
5.2. 次要版本升级
如果要升级Zabbix的次要版本(例如,从 4.0.1 升级至 4.0.3),是非常容易的:
shell> yum upgrade zabbix*待升级完成后,重新修改中文字体(每次更新后必须修改)。
将代码区行的graphfont改为上传的中文字体。
shell> vi /usr/share/zabbix/include/defines.inc.php
define('ZBX_GRAPH_FONT_NAME',           'graphfont'); // font file name
define('ZBX_FONT_NAME', 'graphfont');
6. 安装配置Zabbix Agent
6.1. 获取Zabbix Agent
从Zabbix Download获取下载地址:
下载地址: https://www.zabbix.com/download
6.2. 安装配置Linxu Agent
在CentOS上安装Zabbix agent,可以通过YUM安装直接安装RPM包,还可以通过源码编译安装,在Zabbix 3.4版本之前,官方还提供Precompiled agents介质,下面使用YUM直接安装:
首先,客户端添加官方YUM,并通过YUM安装Zabbix agent:
shell> rpm -ivh http://repo.zabbix.com/zabbix/3.5/rhel/7/x86_64/zabbix-release-3.5-1.el7.noarch.rpm
shell> yum install zabbix_agent
然后,按需根据修改配置文件:
shell> vi /etc/zabbix/zabbix_agentd.conf
PidFile=/var/run/zabbix/zabbix_agentd.pid         # agent pid 的运行目录
LogFile=/var/log/zabbix/zabbix_agentd.log         # agent 运行日志目录
Server=10.1.3.21                                  # 被动模式服务器地址
ServerActive=10.1.3.21:10051                      # 主动模式服务器地址
Hostname=Linux Host # 本机主机名或 IP 地址最后,配置防火墙,启动Zabbix agent,并配置开机自启:
shell> systemctl start zabbix-agent
shell> systemctl enable zabbix-agent
6.3. 安装配置AIX Agent
在AIX上安装Zabbix agent,有两种安装方式。一种为从官网下载预编译好的介质(Precompiled agents)进行安装,另一种是通过源码包编译安装。
值得注意的是,Zabbix agent已从3.0LTS版本开始便不再支持AIX 6.1之前的版本,建议在AIX低版本使用对应的Zabbix agent版本,其对应版本支持如下:
| Zabbix Agent 版本 | 支持的 AXI 版本 |
|---|---|
| Zabbix 4.0 | AIX 7.1 |
| Zabbix 3.0LTS | AIX 7.1 |
| Zabbix 2.4 | AIX 6.1 |
| Zabbix 2.4 | AIX 5.3 |
6.3.1. 预编译文件安装AIX Agent
首先,从官网下载页面下载预编译好的介质(Precompiled agents),并解压到目标位置,解压目标位置可以根据需要决定。
shell> cd /Zabbix
shell> gunzip zabbix_agents_2.4.4.aix6100.powerpc.tar.gz
shell> tar xvf zabbix_agents_2.4.4.aix6100.powerpc.tar其次,添加Zabbix用户和用户组:
shell> mkgroup zabbix
shell> useradd -g zabbix -m zabbix
shell> chuser login=false zabbix再次,将配置文件和agent二进制进程文件复制到指定目录下:
shell> cp -r /Zabbix/conf/zabbix_agentd/    /usr/local/etc/
shell> cp /Zabbix/conf/zabbix_agentd.conf /usr/local/etc
shell> cp /Zabbix/sbin/zabbix_agentd /usr/local/sbin/
根据当前环境修改配置文件:
shell> vi /usr/local/etc/zabbix_agentd.conf
PidFile=/var/run/zabbix/zabbix_agentd.pid         # agent pid的运行目录
LogFile=/var/log/zabbix/zabbix_agentd.log         # agent运行日志目录
Server=10.1.3.21                                  # 被动模式服务器地址
ServerActive=10.1.3.21:10051                      # 主动模式服务器地址
Hostname=AIX Host # 本机主机名然后,添加随系统开机自启动(AIX6.1),需要将对应的Zabbix Agent的源码包下载下来zabbix-2.4.8.tar.gz,待解压后,将目录zabbix-2.4.8\\misc\\init.d\\aix下zabbix_agentd文件拷贝到/etc/rc.d/rc2.d下:
shell> cat zabbix_agentd
#!/bin/sh
#!/bin/sh

##########################################################
###### Zabbix agent daemon init script
##########################################################

case $1 in

start)
    /usr/local/sbin/zabbix_agentd -c /usr/local/etc/zabbix_agentd.conf ;;

stop)
    kill -TERM `cat /tmp/zabbix_agentd.pid` ;;

restart)
    $0 stop
    sleep 10
    $0 start
    ;;

*)
    echo "Usage: $0 start|stop|restart"
    exit 1
esac最新,增设相应权限,并启动Zabbix agent进程。
shell> chmod +x /usr/local/sbin/zabbix_agentd       # 赋予 agent 进程可执行权限
shell> chmod +x /etc/rc.d/rc2.d/zabbix_agentd       # 赋予 agent 开机自启进程可执行权限
shell> mkdir /var/log/zabbix                        # 建立 agent 日志目录
shell> chown -R zabbix:zabbix /var/log/zabbix       # 设置 agent 日志目录属主
shell> mkdir /var/run/zabbix                        # 建立 agent pid 目录
shell> chown -R zabbix:zabbix /var/run/zabbix       # 设置 agent pid 目录属主
shell> /etc/rc.d/rc2.d/zabbix_agentd start          # 启动 agent 进程
6.3.2. 通过源码文件安装AIX Agent
通过源码文件编译安装,需要先解决依赖包,待所有依赖包安装完成后,即可编译安装Zabbix agent。
shell> rpm -ivh libgcc-4.8.5-1.aix6.1.ppc.rpm
shell> rpm -ivh libstdc++-4.8.3-1.aix6.1.ppc.rpm
shell> rpm -ivh libstdc++-devel-4.8.3-1.aix6.1.ppc.rpm
shell> rpm -ivh gmp-6.0.0a-1.aix5.1.ppc.rpm
shell> rpm -ivh mpfr-3.1.2-1.aix5.1.ppc.rpm
shell> rpm -ivh libmpc-1.0.2-1.aix5.1.ppc.rpm
shell> rpm -ivh gcc-4.8.5-1.aix6.1.ppc.rpm --nodeps
shell> rpm -ivh gcc-cpp-4.8.5-1.aix6.1.ppc.rpm --nodeps
shell> rpm -ivh gcc-gfortran-4.8.5-1.aix6.1.ppc.rpm --nodeps
shell> rpm -ivh libstdcplusplus-4.8.5-1.aix6.1.ppc.rpm
shell> rpm -ivh libstdcplusplus-devel-4.8.5-1.aix6.1.ppc.rpm --nodeps
shell> gunzip -c zabbix-2.4.8.tar.gz |tar -xvf -
shell> cd zabbix-2.4.8
shell> ./configure --enable-agent
shell> make && make install
6.4. 安装配置Windows Agent
首先,在Windows上安装Zabbix agent,从官网下载预编译好的介质(Precompiled agents),并解压到目标位置,解压目标位置可以根据需要决定,下代码区为Windows上的Zabbix agent目录文件结构:
C:\\Zabbix>tree /f
卷 System 的文件夹 PATH 列表
卷序列号为 758F-5472
C:.
├─bin
│  ├─win32
│  │  │  zabbix_agentd.exe
│  │  │  zabbix_get.exe
│  │  │  zabbix_sender.exe
│  │  │
│  │  └─dev
│  │          zabbix_sender.dll
│  │          zabbix_sender.lib
│  │
│  └─win64
│      │  zabbix_agentd.exe
│      │  zabbix_get.exe
│      │  zabbix_sender.exe
│      │
│      └─dev
│              zabbix_sender.dll
│              zabbix_sender.lib
│
└─conf
zabbix_agentd.win.conf其次,修改zabbix_agentd.win.conf配置文件,其中LogFile是日志存放的位置,Server为Zabbix Server的地址,ServerActive为开启主动模式并配置Zabbix Server的地址, Hostname为本地客户端的主机名或IP地址。
LogFile=c:\\Zabbix\\zabbix_agentd.log
Server=10.1.3.21
ServerActive=10.1.3.21:10051
Hostname= Windows Host然后,执行安装命令进行安装。其中,-i参数为安装指令,-c参数为执行配置文件的目,-s为启动Zabbix agent服务。
C:\\Zabbix\\bin\\win64>zabbix_agentd.exe -i -c "C:\\Zabbix\\conf\\zabbix_agentd.win.conf"
C:\\Zabbix\\bin\\win64>zabbix_agentd.exe -s最后,zabbix_agentd.exe还有更多的命令语法,建议通过--help参数进行查看:
C:\\Zabbix\\bin\\win64>zabbix_agentd.exe --help
usage:
 zabbix_agentd.exe [-c config-file]
 zabbix_agentd.exe [-c config-file] -p
 zabbix_agentd.exe [-c config-file] -t item-key
 zabbix_agentd.exe [-c config-file] -i [-m]
 zabbix_agentd.exe [-c config-file] -d [-m]
 zabbix_agentd.exe [-c config-file] -s [-m]
 zabbix_agentd.exe [-c config-file] -x [-m]
 zabbix_agentd.exe -h
 zabbix_agentd.exe -V
A Zabbix daemon for monitoring of various server parameters.
Options:
 -c --config config-file        Absolute path to the configuration file
                                (default: "C:\\zabbix_agentd.conf")
 -f --foreground                Run Zabbix agent in foreground
 -p --print                     Print known items and exit
 -t --test item-key             Test specified item and exit
 -m --multiple-agents           For -i -d -s -x functions service name will
                                include Hostname parameter specified in
                                configuration file
Functions:
 -i --install                   Install Zabbix agent as service
 -d --uninstall                 Uninstall Zabbix agent from service
 -s --start                     Start Zabbix agent service
 -x --stop                      Stop Zabbix agent service
 -h --help                      Display this help message
 -V --version                   Display version number
Example: zabbix_agentd -c C:\\zabbix\\zabbix_agentd.conf
Report bugs to: <https://support.zabbix.com>
Zabbix home page: <http://www.zabbix.com>
Documentation: <https://www.zabbix.com/documentation>
7. 官方系统模板的扩展
7.1. Windows计数器键值
| 描述 | 键值 |
|---|---|
| 平均硬盘写入队列长度 | perf_counter[\234(_Total)\1404] |
| 平均硬盘读入队列长度 | perf_counter{\234(_Total)\1402} |
| 文件每秒Bytes/sec | perf_counter[\2\18] |
| 文件每秒读Bytes/sec | perf_counter[\2\16] |
| 物理硬盘空闲率 | perf_counter["\PhysicalDisk(_Total)\% Idle Time",300] |
| 物理硬盘繁忙率 | perf_counter["\PhysicalDisk(_Total)\% Disk Time",300] |
| 硬盘平均队列长度 | perf_counter["\PhysicalDisk(_Total)\Avg. Disk Queue Length",300] |
7.2. 监控Linux&AIX&Windows用户登录
7.2.1. 监控Linux用户登录
关于监控Linux用户登录,是利用Zabbix自带的日志监控功能监控Linux的/var/log/secure日志,当有用户登录失败或者用户在非常规时间登录成功时触发告警。
首先,使用Zabbix提供的键值'log[file,<regexp>,<encoding>,<maxlines>,<mode>,<output>]'来监控Linux的/var/log/secure文件。先介绍下这个键值:
该监控项类型是Zabbix agent(active),返回数据类型是Log。Zabbix agent需要对监控的日志文件有可读权限,否则会返回unsupported。
参数介绍:
- file:日志文件的全路径;
- regexp:过滤日志的正则表达式;
- encoding:字符编码,默认为英文单字节SBCS(Single-Byte Character Set);
- maxlines:agent 每秒发送给 server(或proxy)的数据的最大行数,这个参数会覆盖掉
zabbix_agentd.conf配置文件里的'MaxLinesPerSecond'参数;- mode:可选填参数,即all(默认)或skip(跳过旧数据);
- output:自定义格式化输出,。默认输出regexp匹配的整行数据。转义字符
'\\0'表示regexp匹配的数据,转义字符'\\N'(N=1..9)表示regexp里第N个分组匹配到的数据。 如果填其他字符串就会覆盖掉regexp匹配的数据。
其次,在Linux模版Template_OS_Linux_Chinese下增加登录审核的监控项:
项目名称:用户登录审核
类型:Zabbix端点代理程式(主动式)
键值:log[/var/log/secure,"(Accepted|Failed) password",,,skip,]
数据类型:日志
数据库更新间隔(秒):60
历史数据存储日期:90
应用集:security
注意:正则表达式为"(Accepted|Failed) password",过滤/var/log/secure中的正确或失败的用户登录请求(这里只过滤密码验证方式的登录)。
创建登录失败的触发器:
名称:用户登录失败在主机{HOST.NAME}
表达式:{Template_OS_Linux_Chinese:log[/var/log/secure,"(Accepted|Failed)     password",,,skip,].str(Failed)}=1 and {Template_OS_Linux_Chinese:log[/var/log/secure,"(Accepted|Failed) password",,,skip,].nodata(60)}=0
严重性:警告
该表达式含义为:如果用户登录失败了,监控项返回的数据中会包含Failed,则触发器被触发。如果在60秒内没有接收新数据的话,则触发器恢复,这样就能保证触发器不会一直在触发状态。下面把表达式拆解分析:
A:{Template_OS_Linux_Chinese:log[/var/log/secure,"(Accepted|Failed) password",,,skip,].str(Failed)}=1,表示如果字符串中包含`Failed`则表达式为真;
B:{Template_OS_Linux_Chinese:log[/var/log/secure,"(Accepted|Failed) password",,,skip,].nodata(60)}=0,表示如果60秒内有接收数据则表达式为真,反之则表达式为假。
逻辑为 A and B,表示同时符合 A 和 B 两个条件(同时为真),触发器才会触发。
再次,创建登录成功的触发器:
名称:用户于非工作时间登录成功在主机{HOST.NAME}
表达式:{Template_OS_Linux_Chinese:log[/var/log/secure,"(Accepted|Failed) password",,,skip,].str(Accepted)}=1 and {Template_OS_Linux_Chinese:log[/var/log/secure,"(Accepted|Failed) password",,,skip,].nodata(60)}=0 and ({Template_OS_Linux_Chinese:log[/var/log/secure,"(Accepted|Failed) password",,,skip,].time(0)}<080000 or {Template_OS_Linux_Chinese:log[/var/log/secure,"(Accepted|Failed) password",,,skip,].time(0)}>200000)
严重性:警告
该表达式的含义为:晚上 20 点到早上 8 点之间如果有用户登录成功了,且监控项返回数据中会包含Accepted,则触发器被触发,如果60秒内没有接收到新数据的话,则触发器恢复。下面把表达式拆解分析:
A:{Template OS Linux:log[/var/log/secure,"(Accepted|Failed) password",,,skip,].str(Accepted)}=1。表示如果字符串中包含`Accepted`则表达式为真;
B: {Template OS Linux:log[/var/log/secure,"(Accepted|Failed) password",,,skip,].nodata(60)}=0。表示如果 60 秒内有接收到数据则表达式为真,反之则表达式为假。
C:{Template OS Linux:log[/var/log/secure,"(Accepted|Failed) password",,,skip,].time(0)}<080000。表示当前时间小于 8 点(08:00:00)则表达式为真;
D: {Template OS Linux:log[/var/log/secure,"(Accepted|Failed) password",,,skip,].time(0)}>200000。表示当前时间大于晚上 8 点(20:00:00)则表达式为真。
逻辑为 A and B and(C or D)。表示 A 和 B 要同时为真且 C 和 D 只要一个为真,则整个表达式为真,触发器才会触发。
然后,因为监控日志需要Agent为主动模式,那么在Agent上需要额外配置ServerActive参数。在配置文件zabbix_agentd.conf的ServerActive参数定义了Zabbix Server的地址和端口。
shell> cat /etc/zabbix/zabbix_agentd.conf
ServerActive=10.1.3.21:10051同时,需要修改/var/log/secure被监控文件的权限,/var/log/secure默认权限为600,需要增加用户zabbix的可读权限,命令如下:
shell> setfacl -m u:zabbix:r-- /var/log/secure最后,修改logrotate配置。
shell> sed -i '/kill/a\\/usr\\/bin\\/setfacl -m u:zabbix:r-- \\/var\\/log\\/secure' /etc/logrotate.d/syslog7.2.2. 监控AIX用户登录
由于在AIX系统上的局限性,用户登录审核日志位于/etc/securrity/failedlogin(登录失败)和/var/adm/wtmp(登录成功)文件中,并且读取这两个文件得用who命令读取,显然Zabbix自带的日志监控无法满足需求,只能通过UserParameter自定义key来获取。
首先,参照两个文件的输出内容,可以看到登录信息记录均为单行,不会跨行,是以每行记录一次用户登录行为,那么可以统计这个文件的行数来达到需求:
shell> who /etc/security/failedlogin
root        ssh         Apr 11 13:47     (10.3.10.242)
shell> who /var/adm/wtmp
root        pts/1       Apr 11 11:08     (10.3.10.242)
shell> who /etc/security/failedlogin | wc -l
1其次,在确定了监控思路的情况下,可以着手在Agent上自定义key:
shell> cat /usr/local/etc/zabbix* | grep ^UserParameter
UserParameter=aix.failedlogin,sudo -u root /usr/bin/who /etc/security/failedlogin | wc -l
UserParameter=aix.acceptedlogin,sudo -u root /usr/bin/who /var/adm/wtmp | wc -l
shell> /etc/rc.d/rc2.d/zabbix_agentd restart再次,由于AIX的权限控制比较严格,Agent上的Zabbix用户无法读取这两个系统文件,只能通过安装sudo来完成读取操作,并配置sudo,增加丢两个文件的who命令执行权限:
shell> rpm -ivh sudo-1.7.0-2.aix6.1.ppc.rpm
shell> cat /etc/sudoers
zabbix  ALL=(root)NOPASSWD:/usr/bin/who /etc/security/failedlogin
zabbix ALL=(root)NOPASSWD:/usr/bin/who /var/adm/wtmp从次,在Zabbix Server端增加监控项,监控项为在agent上定义好的自定义key:
用户登录成功监控项:
    名称:用户登录成功信息
    类型:Zabbix代理
    键值:aix.acceptedlogin
    数据类型:数字的(无正负)
    数据类型:十进位数字
    数据更新间隔(秒):60
    应用集:Security
用户登录失败监控项:
    名称:用户登录失败监控项目
    类型:Zabbix代理
    键值:aix.failedlogin
    数据类型:数字的(无正负)
    数据类型:十进位数字
    数据更新间隔(秒):60
    应用集:Security
最后,创建其触发器,
创建用户登录成功触发器:
名称: 用户于非工作时间登录成功在主机{HOST.NAME}, 请登录系统进行检查
表达式: {Template_OS_AIX_Chinese:aix.acceptedlogin.change(0)}<>0 and {Template_OS_AIX_Chinese:aix.acceptedlogin.nodata(60)}=0 and ({Template_OS_AIX_Chinese:aix.acceptedlogin.time(0)}<080000 or {Template_OS_AIX_Chinese:aix.acceptedlogin.time(0)}>200000)
严重性: 警告
该表达式的含义为:在晚上 20 点到早上 8 点之间如果有用户登录成功了,且监控项返回数据acceptedlogin与上次采集的值发生变化,且在 60 秒内有新数据产生的话,则触发触发器,反之触发器恢复。基本思路和 Linux 登录监控触发器思路相同。创建用户登录失败触发器:
名称:用户登录失败在主机{HOST.NAME}, 请登录系统进行检查
表达式:{Template_OS_AIX_Chinese:aix.failedlogin.change(0)}<>0 and {Template_OS_AIX_Chinese:aix.failedlogin.nodata(60)}=0
严重性:一般严重
该表达式的含义为:如果监控项返回数据failedlogin与上次采集的值发现变化,且在 60 秒内有新数据产生的话,则触发触发器,若在 60 秒内没有新数据的话,触发器恢复。基本思路和Linux登录失败触发器思路相同。7.2.3. 监控Windows用户登录
关于Windows用户的登录日志,全部记录在事件管理器中。根据事件管理器中的记录,在Windows模版新建登录成功和失败监控项:
首先,参照在事件管理器中的用户登录成功审核记录,创建对应登录成功的监控项:
名称:Windows Users Login Successful
类型:Zabbix端点代理程式(主动式)
键值:eventlog[Security,,"Success Audit",,^4624$,,skip]
数据类型:日志
数据更新间隔(秒):30
应用集:Login
该监控项中,类型选择
Zabbix agent(active)、数据类型选择Log、监控间隔60秒。其中,监控项Key的参数用大括号包裹,用逗号分隔,下面解释各项参数的含义:
Security:事件的日志名称:Success Audit:事件的Severity;^4624$:这是一个正则表达式,匹配事件ID等于4624的日志;skip:该含义是不监控已产生的历史日志,如果省略skip,会监控所有符合以上条件的历史日志信息。
其次,参照在事件管理器中的用户登录失败审核记录,创建对应登录失败的监控项: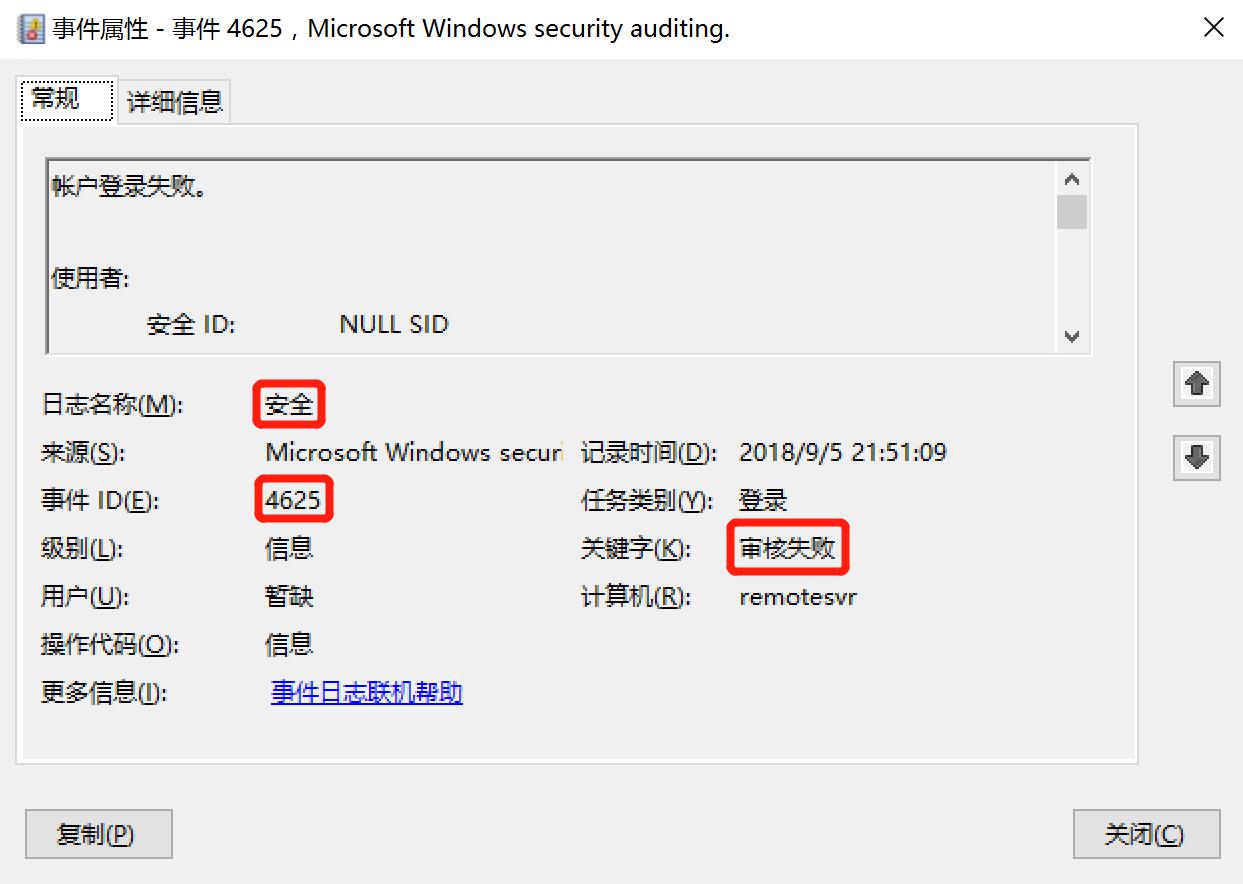
名称:Windows Usesr Login Failure
类型:Zabbix端点代理程式(主动式)
键值:eventlog[Security,,"Failure Audit",,^4625$,,skip]
数据类型:日志
数据更新间隔(秒):60
应用集:Login
从次,创建登录成功的触发器:
名称:Windows Users Login Successful On {HOST.NAME}
表达式:{Template_OS_Windows_Chinese:eventlog[Security,,"Success Audit",,^4624$,,skip].nodata(60)}=0 and {Template_OS_Windows_Chinese:eventlog[Security,,"Success Audit",,^4624$,,skip].str(Advapi)}=0
严重性:资讯
表达式的含义为: 如果在60秒内有监控到数据, 并且监控内容不包含字符串Advapi则触发告警, 如果60秒内没有新的数据了, 则触发器恢复正常; 简单点说就是, 用户登录后触发器触发至少会持续60秒, 如果用户不断的登录成功, 间隔小于60秒, 则触发器一直是problem状态.然后,创建登录失败的触发器:
名称:Windows Users Login Failure On {HOST.NAME}
表达式:{Template_OS_Windows_Chinese:eventlog[Security,,"Failure Audit",,^4625$,,skip].nodata(60)}=0 and {Template_OS_Windows_Chinese:eventlog[Security,,"Failure Audit",,^4625$,,skip].str(Advapi)}=0
严重性:警告
表达式的含义为: 如果在60秒内有监控到数据, 并且监控内容不包含字符串Advapi则触发告警, 如果60秒后没有新的数据了, 则触发器恢复正常; 如果有人不断的恶意破解登录密码, 你会发现触发器problem状态会一直存在.8. 异常处理
8.1. 按时间删除Zabbix历史数据
首先,停止Zabbix Server,获取其缩减时间点的时钟:
shell> date +%s -d "2016-09-30 00:00:01"
1475164801然后,修改MySQL的参数,使Innodb引擎支持缩减,并重启MySQL:
shell> cat /etc/my.cnf
skip-new
shell> systemctl restart mysql最后,使用先前获取的时钟去清理Zabbix的历史数据:
shell> mysql -uroot -p
mysql> use zabbix;
Database changed
mysql> DELETE FROM `history_uint` WHERE `clock` < 1475164801;
Query OK, 13658022 rows affected (19 min 12.00 sec)
mysql> optimize table history_uint;
Query OK, 23959997 rows affected (11 min 41.36 sec)
Records: 23959997  Duplicates: 0  Warnings: 0
8.2. 消息队列堆积
首先,停止Zabbix Server。
shell> systemctl stop zabbix_server然后,连接数据库,执行以下语句:
SQL> update alerts set status=2,error='' where status=0 and alerttype=0;
SQL> delete from escalations;最后,重新启动Zabbix Server。
shell> systemctl start zabbix_server如果觉得我的文章对您有用,请点赞。您的支持将鼓励我继续创作!
赞24作者其他文章
评论 2 · 赞 14
评论 1 · 赞 8
评论 5 · 赞 17
评论 1 · 赞 3
添加新评论8 条评论
2020-05-11 09:31
2020-03-01 08:20
2018-10-10 20:26
2018-10-10 15:57
2018-10-10 14:08
TonyWang: @everychengxuan OK,谢谢
everychengxuan: @TonyWang 你需要哪个组件,直接YUM装就行,官方的YUM源里都有。
2018-10-09 15:11
everychengxuan: @AixTester Zabbix4.0可以在6.5上使用,但是配置前端的部分和7不一样,建议按照官网的步骤来进行安装: https://www.zabbix.com/documentation/current/manual/installation/install_from_packages/rhel_centos#zabbix_frontend_and_server_on_rhel_6
2018-10-09 14:46
2018-10-09 14:29