kubernetes 1.13安装step by step
1.节点规划
| 主机名 | IP地址 | 角色 |
|---|---|---|
| k8s-master.example.com | 192.168.2.175 | k8s主节点 |
| k8s-slave1.example.com | 192.168.2.199 | k8s从节点 |
| k8s-slave2.example.com | 192.168.2.235 | k8s从节点 |
2.软件版本
操作系统:CentOS Linux release 7.5.1804 (Core)
Docker版本:1.13.1
kubernetes版本:1.13.1
3.环境准备
关闭所有节点防火墙
[root@k8s-master ~]# service firewalld stop && systemctl disable firewalld
关闭所有节点selinux
[root@k8s-master ~]# setenforce 0
[root@k8s-master ~]# sed -i 's/SELINUX=enforcing/SELINUX=disabled/g' /etc/selinux/config
设置所有节点/etc/hosts文件
[root@k8s-master ~]# cat /etc/hosts
127.0.0.1 localhost localhost.localdomain localhost4 localhost4.localdomain4
::1 localhost localhost.localdomain localhost6 localhost6.localdomain6
192.168.2.175 k8s-master.example.com k8s-master
192.168.2.199 k8s-slave1.example.com k8s-slave1
192.168.2.235 k8s-slave2.example.com k8s-slave2
关闭所有节点swap
[root@k8s-master ~]# swapoff -a
[root@k8s-master ~]# sed -i '/swap/d' /etc/fstab
所有节点参数设置
[root@k8s-master ~]# cat > /etc/sysctl.d/k8s.conf <<EOF
net.bridge.bridge-nf-call-ip6tables = 1
net.bridge.bridge-nf-call-iptables = 1
net.ipv4.ip_forward = 1
vm.swappiness=0
EOF
[root@k8s-master ~]# sysctl -p /etc/sysctl.d/k8s.conf
[root@k8s-master ~]# modprobe br_netfilter
[root@k8s-master ~]# sysctl -p /etc/sysctl.d/k8s.conf
4.所有节点安装Docker
[root@k8s-master ~]# yum install docker -y
[root@k8s-master ~]# systemctl start docker && systemctl enable docker
5.配置kubernetes阿里源
[root@k8s-master ~]# cat>>/etc/yum.repos.d/kubrenetes.repo<<EOF
[kubernetes]
name=Kubernetes Repo
baseurl=https://mirrors.aliyun.com/kubernetes/yum/repos/kubernetes-el7-x86_64/
gpgcheck=0
gpgkey=https://mirrors.aliyun.com/kubernetes/yum/doc/yum-key.gpg
EOF
6.所有节点安装kubelet kubeadm kubectl包
[root@k8s-master ~]# yum install -y kubelet kubeadm kubectl
[root@k8s-master ~]# systemctl enable kubelet && systemctl start kubelet
7.Docker镜像导入
镜像地址:
链接:https://pan.baidu.com/s/16Uqcd-2Bc2ZOp_DuyhbLyA
提取码:h0bl
[root@k8s-slave1 home]# chmod +x docker.images.sh
[root@k8s-slave1 home]# tar xvf kubernetes_images.tar
[root@k8s-slave1 home]# ./docker.images.sh load-images
8.在Master节点初始化kubernetes集群
[root@k8s-master home]# kubeadm init --kubernetes-version=v1.13.1 --apiserver-advertise-address 192.168.2.175 --pod-network-cidr=10.244.0.0/16
--kubernetes-version: 用于指定 k8s版本
--apiserver-advertise-address:用于指定使用 Master的哪个network interface进行通信,若不指定,则 kubeadm会自动选择具有默认网关的 interface
--pod-network-cidr:用于指定Pod的网络范围。该参数使用依赖于使用的网络方案,本文将使用经典的flannel网络方案。
[root@k8s-master home]# kubeadm init --kubernetes-version=v1.13.1 --apiserver-advertise-address 192.168.2.175 --pod-network-cidr=10.244.0.0/16
[init] Using Kubernetes version: v1.13.1
[preflight] Running pre-flight checks
[preflight] Pulling images required for setting up a Kubernetes cluster
[preflight] This might take a minute or two, depending on the speed of your internet connection
[preflight] You can also perform this action in beforehand using 'kubeadm config images pull'
[kubelet-start] Writing kubelet environment file with flags to file "/var/lib/kubelet/kubeadm-flags.env"
[kubelet-start] Writing kubelet configuration to file "/var/lib/kubelet/config.yaml"
[kubelet-start] Activating the kubelet service
[certs] Using certificateDir folder "/etc/kubernetes/pki"
[certs] Generating "front-proxy-ca" certificate and key
[certs] Generating "front-proxy-client" certificate and key
[certs] Generating "etcd/ca" certificate and key
[certs] Generating "etcd/peer" certificate and key
[certs] etcd/peer serving cert is signed for DNS names [k8s-master.example.com localhost] and IPs [192.168.2.175 127.0.0.1 ::1]
[certs] Generating "apiserver-etcd-client" certificate and key
[certs] Generating "etcd/healthcheck-client" certificate and key
[certs] Generating "etcd/server" certificate and key
[certs] etcd/server serving cert is signed for DNS names [k8s-master.example.com localhost] and IPs [192.168.2.175 127.0.0.1 ::1]
[certs] Generating "ca" certificate and key
[certs] Generating "apiserver" certificate and key
[certs] apiserver serving cert is signed for DNS names [k8s-master.example.com kubernetes kubernetes.default kubernetes.default.svc kubernetes.default.svc.cluster.local] and IPs [10.96.0.1 192.168.2.175]
[certs] Generating "apiserver-kubelet-client" certificate and key
[certs] Generating "sa" key and public key
[kubeconfig] Using kubeconfig folder "/etc/kubernetes"
[kubeconfig] Writing "admin.conf" kubeconfig file
[kubeconfig] Writing "kubelet.conf" kubeconfig file
[kubeconfig] Writing "controller-manager.conf" kubeconfig file
[kubeconfig] Writing "scheduler.conf" kubeconfig file
[control-plane] Using manifest folder "/etc/kubernetes/manifests"
[control-plane] Creating static Pod manifest for "kube-apiserver"
[control-plane] Creating static Pod manifest for "kube-controller-manager"
[control-plane] Creating static Pod manifest for "kube-scheduler"
[etcd] Creating static Pod manifest for local etcd in "/etc/kubernetes/manifests"
[wait-control-plane] Waiting for the kubelet to boot up the control plane as static Pods from directory "/etc/kubernetes/manifests". This can take up to 4m0s
[apiclient] All control plane components are healthy after 20.506840 seconds
[uploadconfig] storing the configuration used in ConfigMap "kubeadm-config" in the "kube-system" Namespace
[kubelet] Creating a ConfigMap "kubelet-config-1.13" in namespace kube-system with the configuration for the kubelets in the cluster
[patchnode] Uploading the CRI Socket information "/var/run/dockershim.sock" to the Node API object "k8s-master.example.com" as an annotation
[mark-control-plane] Marking the node k8s-master.example.com as control-plane by adding the label "node-role.kubernetes.io/master=''"
[mark-control-plane] Marking the node k8s-master.example.com as control-plane by adding the taints [node-role.kubernetes.io/master:NoSchedule]
[bootstrap-token] Using token: ro1pze.q53ah4zw2u4iwwkd
[bootstrap-token] Configuring bootstrap tokens, cluster-info ConfigMap, RBAC Roles
[bootstraptoken] configured RBAC rules to allow Node Bootstrap tokens to post CSRs in order for nodes to get long term certificate credentials
[bootstraptoken] configured RBAC rules to allow the csrapprover controller automatically approve CSRs from a Node Bootstrap Token
[bootstraptoken] configured RBAC rules to allow certificate rotation for all node client certificates in the cluster
[bootstraptoken] creating the "cluster-info" ConfigMap in the "kube-public" namespace
[addons] Applied essential addon: CoreDNS
[addons] Applied essential addon: kube-proxy
Your Kubernetes master has initialized successfully!
To start using your cluster, you need to run the following as a regular user:
mkdir -p $HOME/.kube
sudo cp -i /etc/kubernetes/admin.conf $HOME/.kube/config
sudo chown $(id -u):$(id -g) $HOME/.kube/config
You should now deploy a pod network to the cluster.
Run "kubectl apply -f [podnetwork].yaml" with one of the options listed at:
https://kubernetes.io/docs/concepts/cluster-administration/addons/
You can now join any number of machines by running the following on each node
as root:
kubeadm join 192.168.2.175:6443 --token ro1pze.q53ah4zw2u4iwwkd --discovery-token-ca-cert-hash sha256:0ce98b9856a172168b072d0b6326e2080c76d6fc35f5917b8ab5a6a6254933d1
9.配置kubectl
在 Master上用 root用户执行下列命令来配置 kubectl:
[root@k8s-master kubernetes]# echo "export KUBECONFIG=/etc/kubernetes/admin.conf" >> /etc/profile
[root@k8s-master kubernetes]# source /etc/profile
[root@k8s-master kubernetes]# echo $KUBECONFIG 
10.配置Pod网络
[root@k8s-master home]# kubectl apply -f kube-flannel.yml
查看Pods是否正常
[root@k8s-master home]# kubectl get pods --all-namespaces -o wide

查看节点是否运行正常
[root@k8s-master home]# kubectl get nodes
11.将此节点加入集群,在slvae1和slave2节点执行命令
kubeadm join 192.168.2.175:6443 --token ro1pze.q53ah4zw2u4iwwkd --discovery-token-ca-cert-hash sha256:0ce98b9856a172168b072d0b6326e2080c76d6fc35f5917b8ab5a6a6254933d1
如果忘记token,使用命令查看
[root@k8s-master home]# kubeadm token list
12.使用命令查看节点状态
[root@k8s-master home]# kubectl get nodes
13.查看所有pods状态
[root@k8s-master home]# kubectl get pods --all-namespaces -o wide
14.生成私钥和证书签名
[root@k8s-master home]# openssl genrsa -des3 -passout pass:x -out dashboard.pass.key 2048
[root@k8s-master home]# openssl rsa -passin pass:x -in dashboard.pass.key -out dashboard.key
writing RSA key
[root@k8s-master home]# rm dashboard.pass.key
rm: remove regular file ‘dashboard.pass.key’? y
[root@k8s-master home]# openssl req -new -key dashboard.key -out dashboard.csr
生成SSL证书
将生成的证书mv到/home/share/certs下,将certs拷贝到各个节点
[root@k8s-master home]# scp -r share/ k8s-slave1:/home/
[root@k8s-master home]# scp -r share/ k8s-slave2:/home/
15.安装Dashboard
[root@k8s-master home]# kubectl apply -f kubernetes-dashboard.yaml 
查看dashboard Pods处于running状态
[root@k8s-master home]# kubectl get pods --namespace=kube-system | grep dashboard
查看dashboard的service端口,可以看到service的端口是31234,可以在kubernetes-dashboard.yaml 中查看
[root@k8s-master home]# kubectl get service --namespace=kube-system | grep dashboard
16.创建dashboard用户
[root@k8s-master home]# kubectl apply -f dashboard-user-role.yaml
获取token
[root@k8s-master home]# kubectl describe secret/$(kubectl get secret -nkube-system |grep admin|awk '{print $1}') -nkube-system
Name: admin-token-lcs96
Namespace: kube-system
Labels: <none>
Annotations: kubernetes.io/service-account.name: admin
kubernetes.io/service-account.uid: 9a41d6a0-0e80-11e9-9703-080027a7f8f7
Type: kubernetes.io/service-account-token
Data
token: eyJhbGciOiJSUzI1NiIsImtpZCI6IiJ9.eyJpc3MiOiJrdWJlcm5ldGVzL3NlcnZpY2VhY2NvdW50Iiwia3ViZXJuZXRlcy5pby9zZXJ2aWNlYWNjb3VudC9uYW1lc3BhY2UiOiJrdWJlLXN5c3RlbSIsImt1YmVybmV0ZXMuaW8vc2VydmljZWFjY291bnQvc2VjcmV0Lm5hbWUiOiJhZG1pbi10b2tlbi1sY3M5NiIsImt1YmVybmV0ZXMuaW8vc2VydmljZWFjY291bnQvc2VydmljZS1hY2NvdW50Lm5hbWUiOiJhZG1pbiIsImt1YmVybmV0ZXMuaW8vc2VydmljZWFjY291bnQvc2VydmljZS1hY2NvdW50LnVpZCI6IjlhNDFkNmEwLTBlODAtMTFlOS05NzAzLTA4MDAyN2E3ZjhmNyIsInN1YiI6InN5c3RlbTpzZXJ2aWNlYWNjb3VudDprdWJlLXN5c3RlbTphZG1pbiJ9.pEpo1SjERapnFkYDom437pNcA9wV8mQHOtRs1NuTj5jfQaIpqsGJWpm8r3NOcNB8DI-xWQrP14ylwDcH-uoKjdCuTz8DHffMNcIM4A4hBXf9iUG9Xe6xP4huUhvbIqVbw0sC9MKzoAhTGXvlIKjJ0ZI9r78kCwLC6YQFn7lSdsKn9boy9R4ImjAd0i-h72It4zgNVULnNtvYBCaJ75TuW_vL2rrmo7ha9XkkuwgBS2yJBdRgcbpfAgs1r1-LywpUlA4LOK-NFvY7wij_zG3gU-brLVSURfbrUS9npyxJ45Rp1wBDOYhEsfGKTLAYlkNu0RFTNwAfG0p0z8b3WbOEDA
ca.crt: 1025 bytes
namespace: 11 bytes
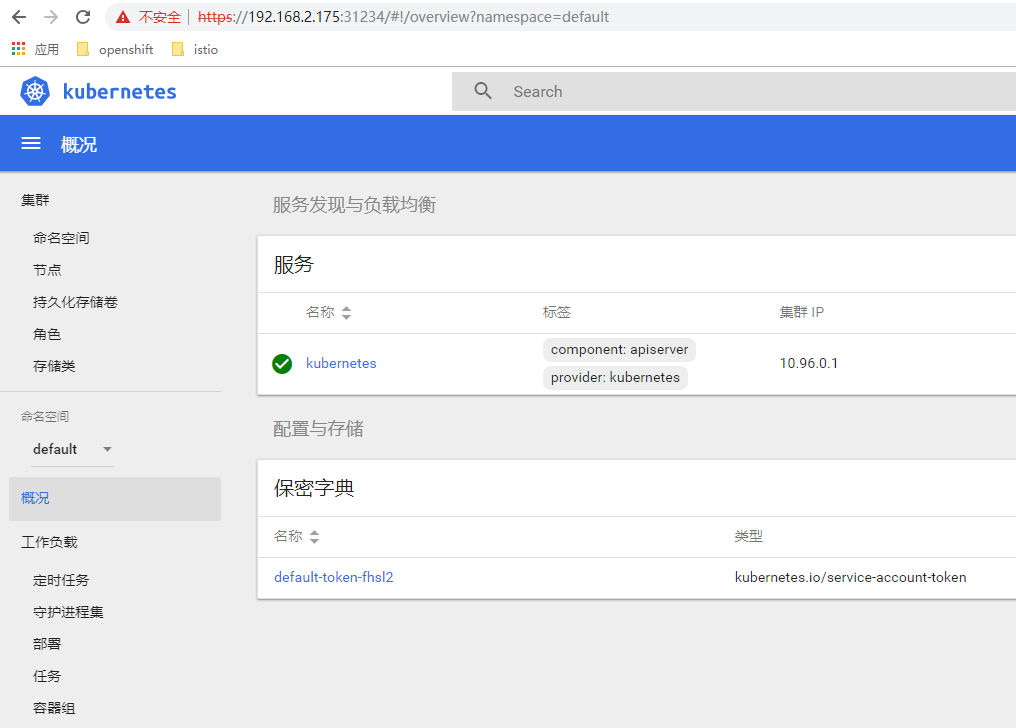
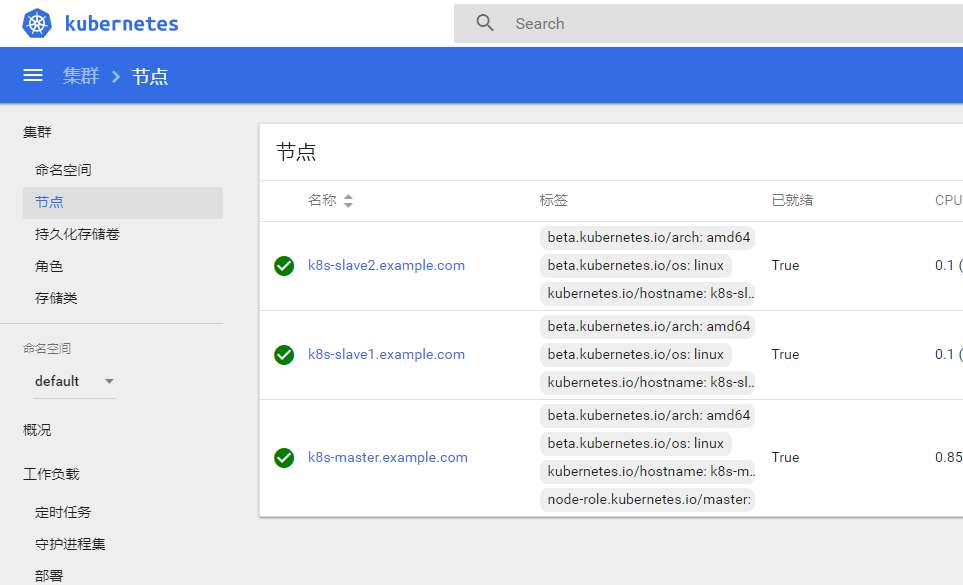
17.浏览器登录
登录完成后,详见如下


如果觉得我的文章对您有用,请点赞。您的支持将鼓励我继续创作!
赞6作者其他文章
评论 1 · 赞 4
评论 1 · 赞 1
评论 0 · 赞 0
评论 0 · 赞 1
评论 0 · 赞 0


添加新评论6 条评论
2019-08-20 17:54
2019-03-29 18:53
2019-01-24 13:20
2019-01-04 20:20
2019-01-04 20:20
2019-01-04 11:10
hbhe0316: @eximbank 华哥吗?